Thursday, March 28, 2013

Homemade Sausage and Cabbage Soup

 It's almost April, and Easter is this weekend, but it still feels like winter here.  There's still snow on the ground and it has been so cold.  I really hope it warms up soon, I can't wait until spring arrives!  But in the meantime, I keep making warm and hearty soups for dinner.  

This sausage and cabbage soup started out with me saying "I have sausage in the freezer and leftover cabbage...what can I make with that??"  I came up with this soup, and to be honest I was a little iffy about it as I was cooking.  I was doubting if my family was going to eat it.  But, I should have had more faith in my cooking abilities:  both of the boys loved it.  And my husband gobbled it up and told me that I should add cabbage to my chicken noodle soup, too.  I don't think I'll be adding cabbage to all my soups, but it does taste good in this one!
 What you need:  for about 10 servings
  • 8 oz Great Northern beans, soaked overnight or quick soaked according to package directions
  • medium onion, chopped
  • 3 carrots, chopped
  • 12 oz cooked sausage, sliced thinly
  • 3 cloves garlic, minced
  • 1 small head of cabbage (about 1/2 of a medium or large head)  Remove outer leaves and core, then chop
  • 4 cups water
  • 14 oz can diced unsalted tomatoes, undrained
  • 1 tsp salt
  • 1/2 tsp black pepper
  • 1 tsp dried basil
  • 1 tsp dried parsley flakes
Let's get cooking:
1.   Drain soaked beans, then add to a medium pot with enough water to cover by 1 inch.  Bring to a boil, then reduce heat and simmer 1 1/2 to 2 hours until soft.

2.  Meanwhile, add remaining ingredients to a stockpot.  Bring to a boil, then reduce heat and simmer about 1 hour.

3.  Drain beans, then add to the stockpot.
 Enjoy your delicious soup for dinner!
-Lily

Wednesday, March 6, 2013

Made-from-Scratch Homemade Chili Recipe

Even though it's March, it was snowing yesterday--and we have about a foot of snow still on the ground!  Weather like this makes me crave comfort foods like this yummy chili.  It's warm, hearty, and so delicious.  

Mmm, peppers, tomatoes, onions--chili has lots of veggie goodness, plus plenty of healthy and filling beans.  I like to start with dried beans because I like to control the salt in my dishes, and because I like texture better.  But, if you're in a hurry you can substitute canned beans.  You can also make it in the crockpot all day and come home to delicious chili waiting for you.


 Ingredients:  For about 8 servings
  • 8 oz dried kidney beans
  • 4 oz dried Great Northern beans
  • 4 oz dried black beans
  • 12 oz ground beef
  • 1 medium onion, chopped
  • 1/2 green bell pepper, chopped
  • 1/2 red bell pepper, chopped
  • 4 cloves garlic, minced
  • Two 14.5 oz cans no-salt-added diced tomatoes, undrained
  • 8 oz can no-salt-added tomato sauce
  • 1 tsp salt (if using canned beans, I would start with 1/2 tsp and add more if needed)
  • 1 to 3 tsp chili powder, to taste
  • 1/2 tsp dried basil
  • 1/2 tsp black pepper
  • hot sauce to taste
Note:  if using canned beans, substitute two 15 oz cans kidney beans, rinsed and drained

 Let's get cooking:
1.  Rinse and soak dry beans overnight (or quick soak) according to package directions.  Drain beans, then place in a pot with enough water to cover the beans by at least 1 inch.  Bring to a boil, then simmer about 1 1/2 to 2 hours, or until soft.

2.  In a large skillet, cook the ground beef until meat is cooked through.  Drain fat.  Remove from skillet.

3.  In skillet, cook onions, peppers, and garlic until soft.

4.  In a stockpot, combine the ground beef, onion, peppers, garlic, tomatoes, and tomato sauce.  Add the cooked beans and spices.  Bring to a boil, then reduce heat.  Simmer 1 hour. 

Slow-cooker directions:  Follow directions as above.  In step four, combine the ingredients in a slow-cooker.  Cook on high for 8 hours or on low 4 hours.
Since I have one- and three-year-olds, I don't make my chili very spicy.  Instead, after we've dished up our chili, my husband and I add hot sauce to taste.  This way, each person controls how spicy it is.

Enjoy your hot, hearty, homemade chili!
-Lily


Linked up at some of the great blogs on my sidebar!

Thursday, February 28, 2013

Great Grandma's quilt blocks

Last year, my great-grandma passed away, and since hardly anyone in the family sews, I inherited a big box full of random fabric.  I really don't know how long it's all been sitting in that box.  But, from the vintage look and feel of the fabrics, (not to mention the dust layers on the box) I think it's safe to say several decades.  Then, buried in the middle of her stash, jackpot!  I found all these old quilt blocks she had made and never put together into quilts.  Some of the bow-tie blocks are even hand-pieced.  I love thinking about my grandma sewing together these same fabrics and the story behind them--how old she was, what was happening in the world when she made them.  I love this generational connection that quilts can create.  I'll be working with these same blocks to finish her quilts years later.  And, I plan on making a baby quilt for my next little one, so this quilt will connect five generations in my family.

I haven't been doing any quilting or sewing recently, but I've been wanting to start a new project and these blocks might actually get me excited enough to start.  I want to make a lap quilt with these white-background blocks.  I love how vintage and antique quilts use fabrics and combinations that I would never choose today.   Look at the two below:  green triangles and red floral?  weird brown squares and pick floral??  It's hard to tell if Grandma had really different tastes than I do, or if she was just being thrifty and using up all the fabric she had on hand.  Either way, these blocks have a completely different look than I would ever create.
I don't know what to call these blocks.  Does anyone know the name of this pattern?? 

These are some of the squares I want to make into a baby blanket.  Again, very different fabric choices than I usually make, but that adds to the charm and beauty of using vintage blocks!

The slowest part of starting these projects has been planning the quilting.  I decided when I first saw the blocks that I want to learn to hand-quilt, to add to the vintage feel.  That has taken some time, and I really, really need to keep practicing so that my quilting will do justice to Grandma's quilts!
-Lily 


Linked up at some of the great blogs on my sidebar

Monday, February 25, 2013

Pulled Pork in a Crockpot

I like to cook, but sometimes it's nice to throw everything in the crockpot after breakfast and magically have dinner ready at 5 o'clock.  This sweet and savory shredded pork recipe is one of my family's favorites. (It's one of my favorites, too, since it's so easy!)  I also love that it has so many veggies, which makes it taste yummy and adds an extra serving of veggies to our dinner. 
Served on hamburger buns, this pulled pork is practically a one-dish meal.  To complete dinner, I usually just whip up some sauteed green beans.   Easy, fast, delicious, cheap, and healthy--all in one meal!


What you need:
  • 3 1b pork roast
  • 14 oz can diced tomatoes, undrained
  • 1 onion, chopped
  • 2 carrots, diced
  • 1/2 red bell pepper, diced
  • 8 cloves garlic, minced
  • 1/2 tsp black pepper
  • 1 Tbs Worchestershire sauce    
  • 1/2 tsp red pepper flakes
  • 1/2 cup brown sugar 
  • 1/2 tsp chili powder 
 Let's get cooking:
1.  Add the tomatoes, onion, carrots, bell pepper, spices, and sugar to the crockpot and stir together.  Add the pork roast on top.

 2.  Cook on low for 8-10 hours or high for 4-5 hours.  Use two forks to gently shred the roast.
And that's it, two steps and you can enjoy your delicious pulled pork dinner!
-Lily

Linked up at some of the great blogs on my sidebar!

Tuesday, February 19, 2013

Should I Homeschool Preschool? Part 4: money

My son Buddy recently turned 3, so my husband and I have been deciding whether to send our son to preschool or do preschool at home.  In Part 1 and Part 2, I talked about the top two reasons why other moms seem to be sending their kids to preschool:  socialization and time alone for mom.  In Part 3, I discussed what kids are learning in preschool and how I can easily teach a preschool curriculum at home.

In this post, I want to talk about one of the major reasons my husband and I decided not to send our son to preschool:  money.  Let's face it, preschool is expensive.  I thought that it was pretty expensive before we started looking into the pros and cons.  Now that I know I can easily teach everything at home that my son could learn at preschool, it means that preschool is a luxury, not a necessity, and I think it's extravagant.  

I looked up some local preschools, and it looks like for 2 days a week, schools charge around $300.  So, if I send my son for 9 months out of the year, we'd be spending $2700!  And that doesn't include other expenses that aren't included in tuition, such as gas to drive him back and forth, snacks for the class, supplies, etc.  Taking an honest look at our budget, we do not spend $300/mo on any other luxury.  We didn't even budget "fun money" until recently.  After all, we're living on one income since I stay home with the boys, and we don't have hundreds of dollars to spend on luxuries.  

Remember, this series is about my family and how we've come to the decision not to send our son to preschool.  For many families, the pros may outweigh the cons.  And, many families may have more discretionary income to spend on school.  Those families may decide to send their kids to preschool rather than homeschooling.  I'm not trying to be judgmental--I'm just presenting the idea that preschool is not mandatory.  Many moms (myself included) automatically think we have to send our kids to preschool without really thinking about whether it's necessary or beneficial.  I don't want to make decisions about this much money based on "everyone's doing it".  
-Lily
linked up at some of the great blogs on my sidebar
Image courtesy of chokphoto at FreeDigitalPhotos.net

Monday, February 11, 2013

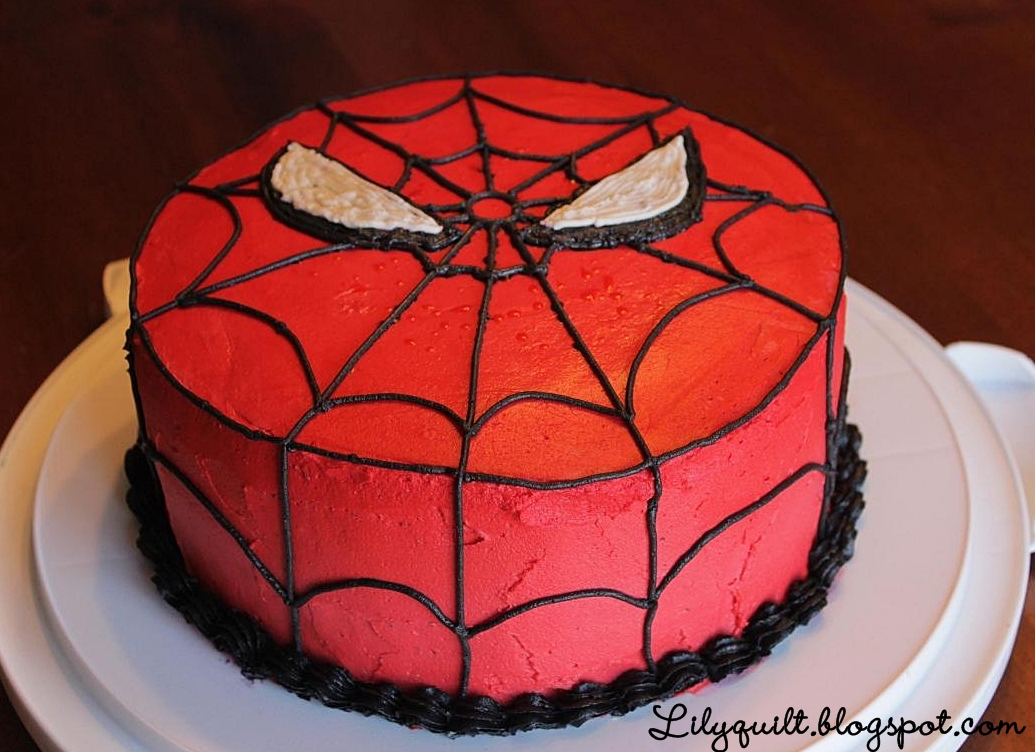
Spider-Man Birthday Cake (Tutorial)

For my Buddy's 3rd birthday recently, I made him this delicious, awesome Spider-man cake!  He loved it, and it was actually a lot simpler to decorate than other cakes I've attempted.  I admit that I'm just an amateur who dabbles in cake decorating.  So, anytime I find a super-cute, super-easy cake design, that's the one for me!

My son really wanted the cakes colored.  He still talks about the rainbow cake that I made for my Little Man's birthday a few months ago!  He wanted a rainbow cake, too, but I knew that he would love this superhero cake, so I told him I'd make the cakes red and blue--Spider-man colors!

Let's get decorating:

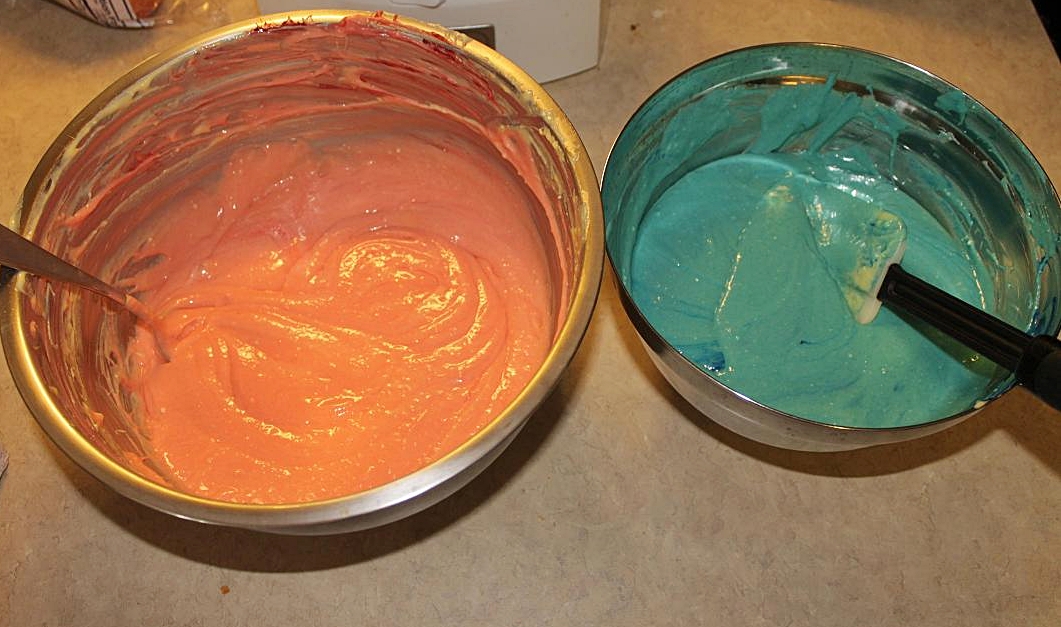
1.  First, I made two cakes mixes, one for each 9" layer.  (That way, my cakes turn out plenty thick, so that later I can level them for stacking and still have some cake left.)  Prepare the cakes mixes in separate bowls.

2.  Stir in blue food coloring gel in one bowl and red in another until you have nice colors. 

Unfortunately, I ran out of red and my top layer looked suspiciously like pink, but my son never noticed.

3.  Bake your cakes.  If you use one cake mix for each layer like I did, this will take longer than the box directions.  Just bake until a toothpick comes out clean.  After the cakes have cooled a little, remove them onto a wire rack to finish cooling.  After they're completely cool, use a cake leveller or a knife to level the tops of the cake so you can stack them.

After the first layer, put a thick layer of icing on top.  I used white because I guess I hadn't mixed my icing colors yet, but you could also use red.

4.  Use food coloring gel to make red and black icing.  (Warning:  you have to use a lot of dye to make true red and black colors that don't look pink or gray.)

Stack the second layer on top, and cover the entire cake with red icing.

5.  Load a piping bag with black icing.  Using a writing tip, draw a small circle in the middle of the cake.  I used a toothpick to lightly mark 10 lines equally spaced around the small circle.  Then pipe lines radiating out from the small circle, all the way down the sides of the cake.

6.  After you've drawn all 10 lines, connect them with arches to make it look like a spider-web.  I used two rings of arches on the top of the cake and one ring around the sides.  I also connected the lines in a ring around the top edge.

7.  Draw two large eyes with the writing tip.  I started mine just under the small circle in the center.  After drawing them and making sure I was happy that they matched, I filled them in using the writing tip.  After the icing dried, I just used my finger to smush the lines together a little bit.

8.  Fill a 2nd piping bag with white icing.  I made the top of of the eyes just like I did the black layer:  I drew it with the writing tip first, then filled it in.  After the icing dried, I smushed it a little so the lines weren't so obvious.

Finally, I piped black shells around the bottom edge. 

And that's how you impress your superhero-loving husband 3-year old!
-Lily

Linked up at some of the great blogs on my sidebar!

Tuesday, February 5, 2013

Should I Homeschool Preschool? Part 3: Academics

My son just turned 3, so my husband and I have recently been deciding whether to send our son to preschool or do preschool at home.  In Part 1 and Part 2, I talked about the top two reasons why other moms seem to be sending their kids to preschool:  socialization and time alone for mom.
By now, you might be asking the same question that I am, "What about academics??"  After all, this is the 3rd post in this series, and I haven't once used the words "curriculum" or "literacy". When I first started considering sending my son to preschool, I thought that academics would be the most important thing to consider.  After all, it is pre-school.  I guess I was worried that if he doesn't have the same math and writing curriculum as his peers, he might be behind forever.  But, when I started asking my friends why they send their kids to preschool, it was "socialization and time alone" over and over.  I was really surprised, almost no one mentioned anything that had to do with actual schooling or academic learning.  So I started looking up websites from local preschools, trying to get info on their curriculum.  It seems that kids at preschool are learning literacy, writing skills, critical thinking, math, science, and fine- and gross-motor skills development.  What?!  I thought, it's just as I feared, my son will be behind forever, we don't do any of that! 

But, then I asked some friends what their kids actually do at preschool, as well as thinking more critically about our time at home.  The truth I learned is that kids learn by playing and through hands-on activities, and I am already teaching my boys everyday:
literacy = reading together
writing/fine motor skills = drawing, playdough
critical thinking = pretending, puzzles
math and science = nature walks, cooking together
gross motor skills = playground, running/jumping

I've also had several people ask me if I plan on doing a lot more "preschool activities" if I homeschool.  I'm assuming this means workbooks and formal lessons.  For now, the answer is no.  I see no reason to give worksheets and schoolwork to a three-year-old.  He learns by playing, by doing, and by watching and helping me.  There's no rush for schoolwork.  He has years ahead full of academics and studying, but only a short time to be a little kid :)
linked up at some of the great blogs on my sidebar!
Image courtesy of chokphoto at FreeDigitalPhotos.net