Showing posts with label kids. Show all posts

Wednesday, May 8, 2013

Teaching Kids Chores in 3 Simple Steps

Teaching kids how to do chores is a pretty universal parenting goal.  It's an important goal at our house, for several reasons.  I want my kids to learn life skills like how to cook and do laundry.  I want them to understand that in our house, everyone works before we play.  I want them to be willing to work, and not view Mom as a maid.

I used to work in a biochemistry lab, and these were the three basic steps we used to teach coworkers how to do an experiment.  After I had Buddy, I realized that I could apply the same steps to teach my kids almost any complex task or process (like a life skill or chore).  So, yes, I am teaching my kids like we're in a science lab.  My husband can laugh at my mad scientist ways, but I've found this to be a valuable way to think about how to teach my kids. 
Three deceptively simple steps to teaching kids chores:

1.  Demonstrate.  Show your child how to do the process, explaining as you go.  Make sure to explain what you're doing and why.

For example, if you're teaching how to sweep the floor, don't just sweep and have him passively watch from the sidelines.  Have him help a little.  Answer his questions.  Explain how to hold the broom, how you're careful to sweep all the corners, to not spill crumbs out of the dustpan, etc .


2.  Supervise.  The child primarily does the chore, with you supervising.  You correct and assist as needed, but let him do most of the work.  


3.  Leave.  Your child does the chore on his own, with you nearby so he can come and ask for help if needed.  When he's done, you come and make sure he did everything correctly.  If not, you have him do it again with you supervising.

Sometimes it takes a long time for each step, especially with very young kids.  I've been working on teaching my three-year old how to sweep the floor for months.  For a while, he just watched, or he'd hold the dustpan to "help" but I actually did the work (Step 1).  Then, he got his own child-size broom and dustpan several months ago for Christmas.  Since then he's been practicing sweeping up dirt (Step 2).  He actually helps now--I do the major sweeping with a big broom, then he sweeps up the crumb piles into his dustpan and carefully throws them away (Step 3).  I consider this Step 3 for him, since he can do his part of the assigned chore without me watching.  


For my kids, by the time they're three years old I expect them to do one or two simple chores without direct supervision.  By the time they're school aged, I'll expect them to do quite a few tasks correctly, in a timely manner, and without me telling/showing how to do it every time. 

Check back in a few days, I'll be discussing where I trip up teaching chores.
-Lily

Linked up at some of the great blogs on my sidebar!

Thursday, April 11, 2013

Reversible Two-in-One Little Girl Skirt

As we all know, I have two little boys, so I always love a chance to sew for little girls.  One of Buddy's friends turned three, and I whipped up this fast and easy skirt for her.  The beauty of this skirt is, it's actually two skirts in one!  I've made skirts similar to this one before, and it doesn't take any extra effort to make it reversible, just a little careful planning (which I have conveniently done for you). 
Another advantage is that this skirt is double layered.   Many little-girl skirt patterns are not lined, they just use a single layer of cotton fabric.  In my experience, a single layer is too see-through to make a good skirt.  Last time I made a similar skirt, I lined it with white cotton.  Then it dawned on me:  if I had used patterned fabric, the skirt would be reversible! 

This skirt is a great beginner project, it's really just a few straight seams and comes together quickly.  The hardest part is deciding which two cute fabrics to use! 

I made mine for a three-year-old, the final measurements were 18 inch waist and 11.5 inch length.  It's pretty easy to adjust the measurements, though, if you're making this for a younger or older girl.

What you need:
  • Fabric A, cut 14" by 42"
  • Fabric B, cut 11.5" by 42"
  • 19" length of 3/4" elastic
  • Coordinating thread, I used Coats and Clark All-Purpose
If you want to adjust the skirt length: 
Cut Fabric B the desired length.  Then cut Fabric A 2.5" longer.  For example, I wanted an 11.5" length, so I cut Fabric B 11.5" x 42".  Then I cut Fabric A, 14" x 42". 

For the waist, I just added 1" to my final measurement for the elastic.  I wanted an 18" waist, so I cut my elastic 19". 

Let's get sewing:

 1. Pin the 14" ends of Fabric A right sides together.  Sew with a 1/2" seam allowance.  You should now have a tube.  Press the seam open.  

2.  Pin the 11.5" ends of Fabric B right sides together.  Sew with a 1/2" seam allowance.    Press the seam open. Your fabrics should look like the pic below:  Fabric A is the floral and Fabric B is the yellow gingham.

3.  Turn Fabric B right-side-out.  Slide Fabric B over Fabric A, lining up the seams.  The two fabrics should be wrong sides together.  You should have about 1" of Fabric A showing at the bottom and 1.5" of Fabric A showing on top.

 4. To form the bottom hem, press and pin Fabric A on top of Fabric B.  Press 1/4", then 3/4".  Topstitch 1/8" from the pressed edge.  You should be sewing through both fabrics. 

5.  To form the casing for the elastic, press the top of Fabric A in 1/2", then 1".  Topstitch 1/8" from the pressed edge, leaving a 3" opening in the back.   Again, you should be sewing through both fabrics.  Use a safety pin to thread the elastic through, making sure it doesn't get twisted.

6.  Overlap the ends of the elastic by 1/2" and sew together securely.  Then tuck the elastic into the opening, fold down Fabric A, and topstitch the opening closed.  Make sure you don't catch the elastic as you sew.


And that's it, six steps and you've made two adorable little girl skirts!

-Lily


Linked up at some of the great blogs on my sidebar

Monday, February 11, 2013

Spider-Man Birthday Cake (Tutorial)

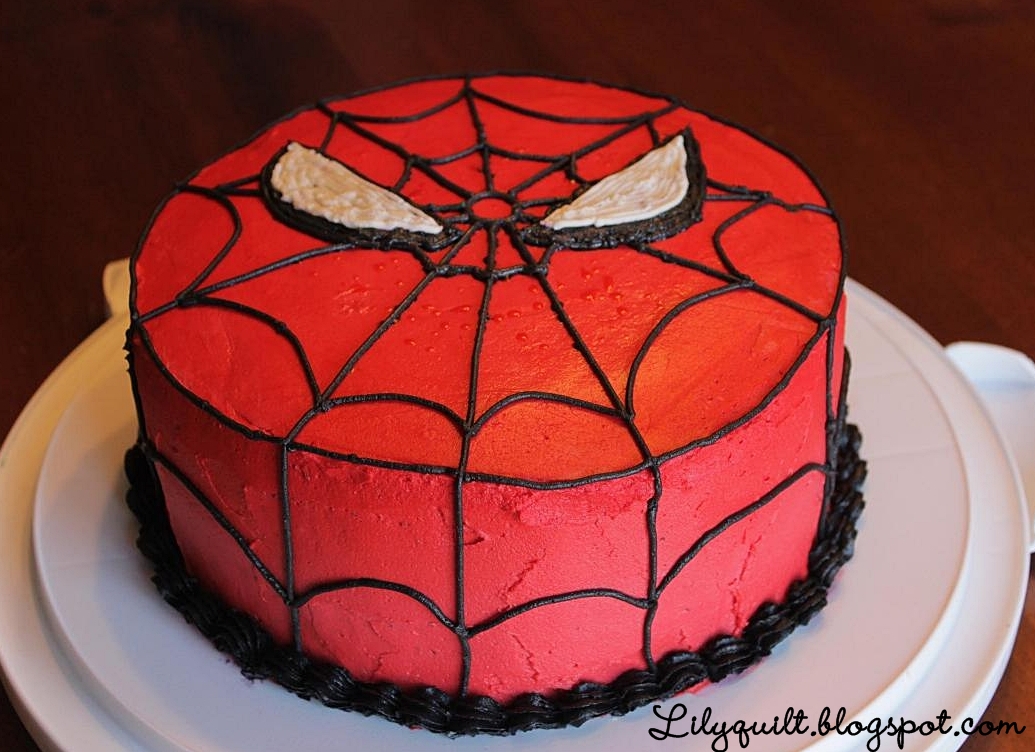
For my Buddy's 3rd birthday recently, I made him this delicious, awesome Spider-man cake!  He loved it, and it was actually a lot simpler to decorate than other cakes I've attempted.  I admit that I'm just an amateur who dabbles in cake decorating.  So, anytime I find a super-cute, super-easy cake design, that's the one for me!

My son really wanted the cakes colored.  He still talks about the rainbow cake that I made for my Little Man's birthday a few months ago!  He wanted a rainbow cake, too, but I knew that he would love this superhero cake, so I told him I'd make the cakes red and blue--Spider-man colors!

Let's get decorating:

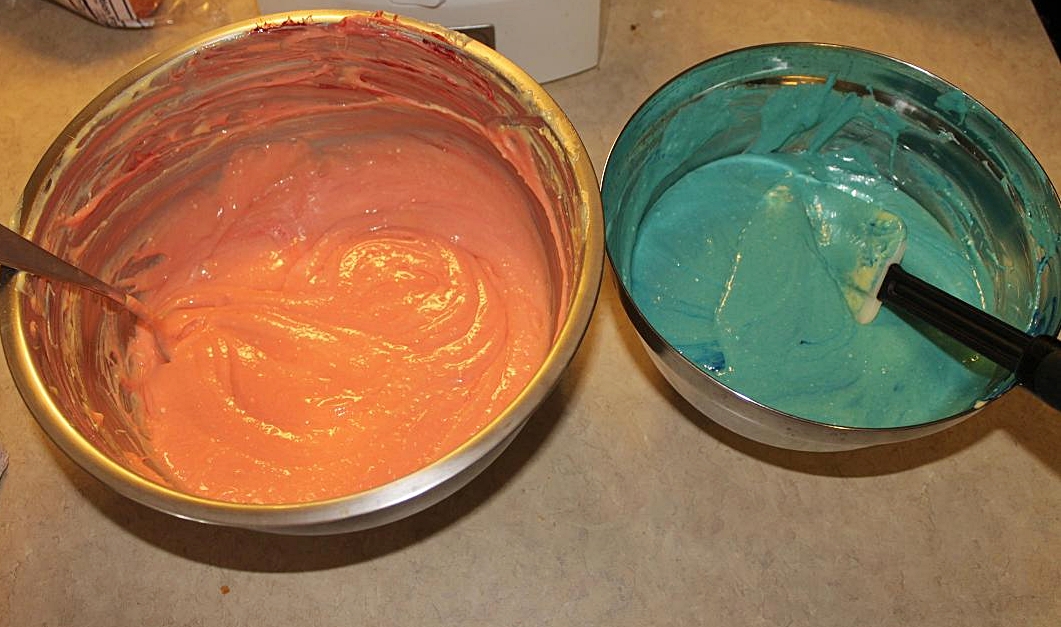
1.  First, I made two cakes mixes, one for each 9" layer.  (That way, my cakes turn out plenty thick, so that later I can level them for stacking and still have some cake left.)  Prepare the cakes mixes in separate bowls.

2.  Stir in blue food coloring gel in one bowl and red in another until you have nice colors. 

Unfortunately, I ran out of red and my top layer looked suspiciously like pink, but my son never noticed.

3.  Bake your cakes.  If you use one cake mix for each layer like I did, this will take longer than the box directions.  Just bake until a toothpick comes out clean.  After the cakes have cooled a little, remove them onto a wire rack to finish cooling.  After they're completely cool, use a cake leveller or a knife to level the tops of the cake so you can stack them.

After the first layer, put a thick layer of icing on top.  I used white because I guess I hadn't mixed my icing colors yet, but you could also use red.

4.  Use food coloring gel to make red and black icing.  (Warning:  you have to use a lot of dye to make true red and black colors that don't look pink or gray.)

Stack the second layer on top, and cover the entire cake with red icing.

5.  Load a piping bag with black icing.  Using a writing tip, draw a small circle in the middle of the cake.  I used a toothpick to lightly mark 10 lines equally spaced around the small circle.  Then pipe lines radiating out from the small circle, all the way down the sides of the cake.

6.  After you've drawn all 10 lines, connect them with arches to make it look like a spider-web.  I used two rings of arches on the top of the cake and one ring around the sides.  I also connected the lines in a ring around the top edge.

7.  Draw two large eyes with the writing tip.  I started mine just under the small circle in the center.  After drawing them and making sure I was happy that they matched, I filled them in using the writing tip.  After the icing dried, I just used my finger to smush the lines together a little bit.

8.  Fill a 2nd piping bag with white icing.  I made the top of of the eyes just like I did the black layer:  I drew it with the writing tip first, then filled it in.  After the icing dried, I smushed it a little so the lines weren't so obvious.

Finally, I piped black shells around the bottom edge. 

And that's how you impress your superhero-loving husband 3-year old!
-Lily

Linked up at some of the great blogs on my sidebar!

Monday, December 31, 2012

Tutorial: Spider PJ's from a Men's T-Shirt (Part 2)

Several months ago, I found a fun tutorial on how to make little man PJ's from a men's X-large t-shirt.  I thought it was an awesome idea, but I didn't follow the tutorial exactly when I made mine.  So, I thought I'd show how I made my little guy his awesome spider pajamas!

I posted the first part of this tutorial over a month ago, and time has somehow gotten away from me over the holidays, so I'm finally posting the second half.  In the first part of the tutorial, I showed how I made the raglan shirt.  Here, I'll show how I made the pants.
What you need:
  • XL men's shirt (plenty of material for size 2T PJ's)
  • pair of pajamas to use as pattern pieces
  • matching thread
  • ball-point needle for sewing knits
  • 1/2 yard of 3/4 inch elastic

Let's get sewing:

1.  Lay out the men's t-shirt flat.  Place your pattern pajama pants on top of one sleeve, lining up the hem of the pants and the hem of the sleeve.  I used the whole width of the sleeve, so I didn't have to worry about sewing the inseam of the pants.  I cut about 2 inches above the top of the pants to allow enough fabric to form the elastic casing.

Repeat this step on the other sleeve.

2.  Turn one pant leg inside-out.  Place the right-side out leg inside the other (it should look like the pic).  Match the U-shaped seam and sew, using a 1/2 inch seam allowance.

I originally used a straight stitch, but then did some reading and found that a lot of people have problems with straight stitches popping on knits.  So, I added a zig-zag stitch, too. (I don't think this was the best solution, but using this method I didn't have to actually make a decision about which stitch to use.)

3.  Turn the pants inside-out.  Fold down the top edge 1/2", then another 1" to form the casing.  Topstitch 1/8" away from the edge, leaving a 3" opening. 

4.  Use a safety pin to thread the elastic through. 

5.  Overlap the elastic ends 1/2" and sew together.  Tuck inside the casing and sew closed. 

Turn your pants right-side out, and your little man PJ's are ready to go!
-Lily

Linked up at some of the great blogs on my sidebar!

Monday, December 3, 2012

Nativity Markers for an Advent Calendar

 A few weeks ago I posted a tutorial for my advent calendar.  A few days ago, just in time for December, I finally finished it.  I decided to put a baby Jesus in the December 25th pocket and move the star each day--when the star reaches baby Jesus, it's Christmas!  Each night this month, we'll read part of the Nativity story with the kids, then move the star a little closer to Jesus and talk about how on Christmas we celebrate his birthday.

I put a piece of Velcro on the back of the baby and the front of the hay, so the kids can have fun laying him in the manger.
 Now I want to make a flannel board and a whole Nativity set like this, since they're so cute and I think the kids would love it.  But, I don't think I'll have the time before Christmas--maybe next year??

What you need:  I used felt for the front and an extra-heavy stabilizer for the back, so these shapes are pretty sturdy.  Hopefully they can withstand a one- and two-year-old.
  •  Peltex sew-in ultra firm stabilizer
  • scraps of felt
  • embroidery floss
Let's get sewing:
1.  Cut out a manger shape, an oval, and a star from the peltex.  Use these as templates to cut out shapes from the felt: yellow star, brown manger, yellow straw, and a white oval.  Also, cut out a peach circle for the baby's face.

 2.  Pin or hold the peltex and felt together, then use embroidery floss to sew them together.  I used a blanket stitch around the edges with 2 strands of embroidery floss, but you can use more strands if you'd like more noticeable stitches.

3.  To attach the baby's face and the straw that overlaps the manger, I used a simple running stitch.  Then I added half-circles for Jesus' closed eyes, and a few lines of blue backstiches to look like he's swaddled.  Last, I attached the velcro to the manger and the back of the baby.

-Lily


Linked up at some of the great blogs on my sidebar!

Thursday, November 29, 2012

Tutorial: Spider-Man Pajamas from a T-Shirt (Part 1)

Ever since I started sewing, my pack-rat tendencies have gotten a little out of hand.  I have stacks and stacks of old clothes that I can't bear to give away--it's free fabric after all, and maybe I could use it one day (I know, big maybe...)  

I found a tutorial at It's Always Autumn on making little man pj's from a t-shirt, and I knew I had to make some cute jammies for my little man.  Just making grey pants and a black shirt seemed awfully plain.  I added a grey spider to the shirt, and suddenly, they're awesome Spider-Man pajamas! 
My adorable model, I think he's singing "Itsy Bitsy Spider"
This is part 1, where I'll cover how I made the raglan shirt.  Check out part 2 for the pants tutorial.
What you need:
  •  XL men's shirt (plenty of material for size 2T pj's)
  •  pair of pajamas to use as pattern pieces
  • matching thread
  • ball-point needle for sewing knits
 Let's get sewing:
1.  Lay out your pattern piece at the center of the t-shirt, lining up the bottom hems and folding in your sleeves.  Cut about 1/2 inch away from the edge (to allow for seam allowances).  If you want to make set-in sleeves, check out the original tutorial.

2.  Cut sleeves from the sides of the shirt.  Again, use the existing hem at the bottom of the t-shirt and add 1/2" on all sides for seam allowances. 

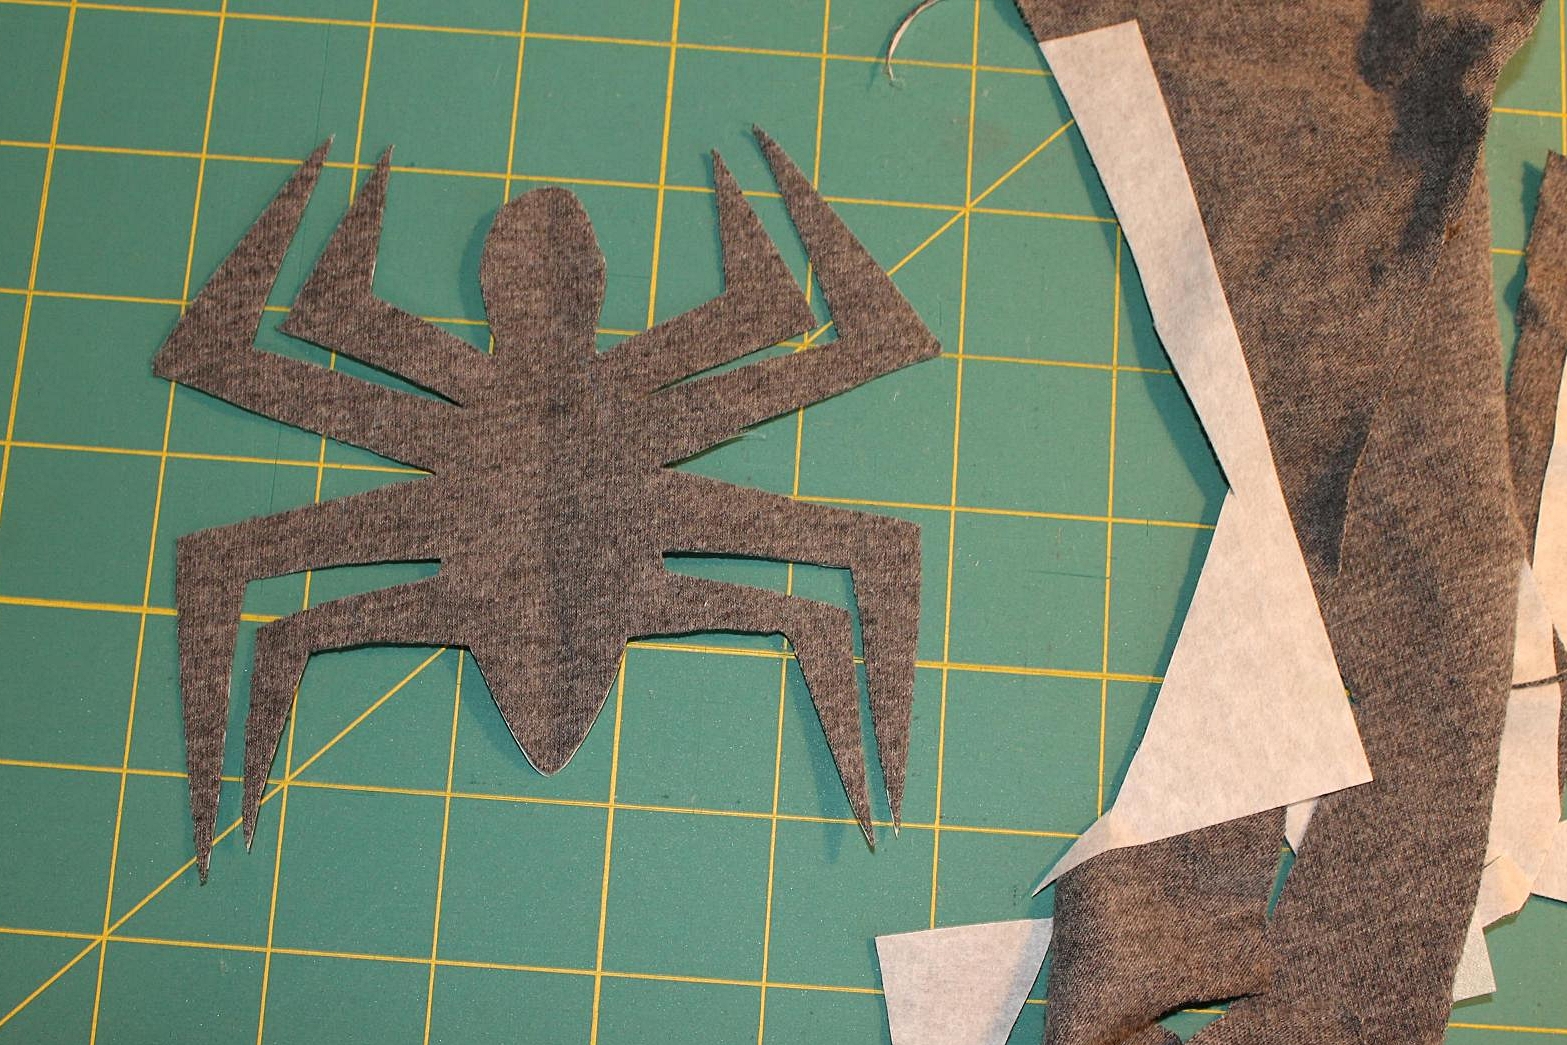
3.  Cut out a spider (I did this free-hand, but I'm sure you could find a Spider-Man printable for a template.)  I used extra material from the sleeve of my t-shirt.  **But, you might want to wait until after you cut out your pants to cut out the applique, since you'll be using the sleeves to make the pant legs.

 I used fusible web to attach the spider to the front of the shirt.  Then I sewed around with a straight stitch about 1/8" from the edge to securely attach it, leaving the edges raw.

4. Place shirt pieces right sides together and sew the two sides, up to the bottom of the diagonal.  Since I don't have a serger, I had to decide whether to use a straight stitch or a zig-zag stitch.  I ended up sewing 1/2" from the edge with a straight stitch, then 1/4" from the edge with a zig-zag because I've read about popped seams when working with knits.

5.  Place sleeve pieces right sides together and sew along both sides, leaving the diagonal open.

6.  Turn the sleeves right-side out.  Place one inside the shirt, with right sides together.  Line up the seam at the bottom.  Starting at the back neck point, sew along one side of the diagonal, across the seam, then along the other side of the diagonal.

Repeat for the 2nd sleeve.

7.  Turn the shirt right-side out.  Cut the collar off your XL t-shirt.  Measure the collar of your pattern pj's and add about 1", then cut your collar piece.  Tuck in one end 1/4" and tuck the other end inside.  You should now have a circular collar with no raw edges.

Center the collar join in the back.  Pin the collar around the top of the shirt, aligning the raw edges.  Sew together with a zig-zag stitch.

Fold down the collar, then sew 1/8" under the collar with a straight stitch.  Make sure to stretch as you sew so the stitching won't be too tight to stretch over a toddler's head.

And that's it, you've finished the top and are ready to move on to making the pants! 
-Lily

Linked up at some of the great blogs on my sidebar

Monday, November 19, 2012

Advent Calendar Tutorial

Sometimes, projects can sit around waaaay too long.  For example, I started this advent calendar last November...and I just finished it.  But, it's the end result that matters, right?  And it did turn out really cute, so I'm glad I didn't try to rush it.  Don't be alarmed, it's a pretty simple project.  About 98% of the time I took to finish it was spent procrastinating.  
Now all I have to do is make a felt marker to move from pocket to pocket.  Hopefully that doesn't take me until next Christmas!  (Update: Check out the tutorial for the felt star and baby Jesus markers I made)

What you need:
  • 1 main fabric, 24 x 22 inches
  • 1 backing fabric, 24 x 22 inches
  • 1 piece of batting, 24 x 22 inches
  • 4 pieces of fabric 8 x 8 inches, for the tabs.  I don't recommend a directional fabric, or you might have upside-down trees like me, oops.
  • 5 pieces of white fabric, 9 x 20 inches, for the pockets
  • Red felt
  • White and green embroidery floss
Let's get sewing:  I used all-purpose white thread and a 1/2" seam allowance.

1.  First, make the pockets.  I decided it was a lot easier to make 5 long pockets and divide them with quilting lines, rather than sew on 25 separate pockets.  Fold your rectangles in half, right sides together, so that you have 4.5 x 20" rectangles.  Sew around the 3 open edges, leaving a 3" opening for turning.  Clip your corners (see pic) so they'll lay flat when turned out.
Turn out the pockets, press, and topstitch 1/8" and 1/4" away from the folded edge.

2.  Next, make the tabs.  Fold the squares in half, right sides together.  Sew along the open long side of the rectangle formed.  Turn out and press. 

3.  Place your backing and main fabrics right sides together, and place the batting on top.  Pin the the tabs along a short end.  Place between the main and backing fabrics, aligning the raw edges.  Place the two outer tabs 1" from the edge and leave about 2.5" between tabs.

Sew around all four edges, leaving a 5" opening in the bottom for turning.  Turn out, then topstitch 1/4" and 1/2" away from the edge.

Your calendar should now look like this:

4.  Cut out 40 1.5 x 2.5" rectangles from red felt, then cut out all the numbers by hand.  (I started with rectangles because it helped me keep the numbers a consistent size.)

5.  Lightly mark the pockets about every 3 3/4"--that's where the dividing lines for the pockets will be.  Use these lines to help center your numbers.

I couldn't decide whether to use white or green thread, a running or blanket stitch, so I used all of them to attach my numbers.  You can use your preferred hand stitch, or even attach the numbers by machine.  I used 2 strands of embroidery floss.

6.  Now attach your pockets to the calendar.  Note that in my pic, I don't have the numbers attached.  I added them after sewing the pockets to the calendar, which I think was a bad idea.  It was really hard to get my needle in and out behind the pocket without sewing through the main fabric.  If I did this again, I would attach the numbers first, then attach the pockets second.

Pin your pockets on the calendar and topstitch along three edges to attach, leaving the top of each pocket open. 

7.  Using your marks as a guide, topstitch about every 3 3/4" to form pockets.  I did this with hand-quilting, but you could also use a machine.
Have fun counting down and preparing for Christmas!
-Lily

Linked up at some of the great blogs on my sidebar