Tuesday, February 4, 2014

Hulk Birthday Cake

I can't believe my oldest, Buddy, is 4 years old!  Of course, like most four-year-old boys, he loves superheroes, so this year he requested an Avengers cake.  After searching around on Pinterest, I decided that a Hulk cake would be the easiest Avenger to create in a cake design.  I know, that's not a very good reason to choose your son's birthday cake, but I justified it by telling myself that I have a 5-month-old baby, so I don't need to spend hours on a cake.

Last year, Buddy requested a Spider-man cake.  And, he's already told me that he wants a Hawkeye cake next year, and that his little brother would like an Iron Man cake for his birthday (in October).
To start I made a regular two-layer cake and coated it with bright green buttercream.  I piped on the hair and face with a writing tip using black icing.  For the teeth, I used a basketweave tip backwards, so the teeth look smooth with jagged edges.  Then I piped Hulk's eyes in green icing with a writing tip.  Super easy for how awesome it turned out!

Tuesday, January 28, 2014

Teacher Gift: Class Signature Quilt

I've been so bad about posting all my quilt finishes recently.  I don't want to forget this signature quilt, because I love this idea for a teacher appreciation gift!  The customer convinced all the parents in her child's kindergarten class go in together for a gift.  Rather than everyone buying a small (and often rather useless) gift, they all went in together on these awesome quilts!  The customer picket out and bought the frog fabric.  Then she secretly had all the kids in her child's kindergarten class sign it in two different places with a fabric maker, then sent it to me. 

To assemble the quilt, all I did was add borders with corner squares.  I wanted the focus to stay on the center panel and the adorable 5-year-old signatures, so I kept the piecing simple and used solids for the border.  After basting, I added teacher's name and the year with fusible web.  Then I appliqued with a zig-zag stitch. 
I outline-quilted the border and corner squares.  I also highlighted all the signatures with quilted boxes.  Then I decided it needed more quilting, so I outlined some of the fun frogs, too.

I love how the outlined signatures turned out! The back really shows off the effect of the random-box quilting:

I also made a similar wall-hanging sized quilt for the teacher's aid the same way as the larger quilt.  I just added hanging tabs, and did a turn-out and topstitch finish on the edges rather than binding. 


Gender Neutral Thank You Cards


When I was pregnant, I knew that we'd get some new-baby gifts.  So, I whipped up these gender-neutral thank-you cards when I had a burst of nesting energy in the last weeks of my pregnancy.  Now that we know that BT is a boy, it's a little weird to think back to just a few months ago when we were guessing!

I wanted these to work whether we had a boy or girl, so I used red/yellow/brown for the colors. They were ready and waiting to be sent when I had the baby and couldn't do any crafting for a few months.  I also kept them really simple, with no ribbons, buttons, stitching that you usually see on homemade cards  It was nice being able to crank these out assembly-line style in under an hour!

Saturday, December 7, 2013

Great Grandma's Bow-tie Quilt--Finished!

Drumroll please....ta-da!  I finally finished this baby quilt using my great-grandma's quilt blocks!  It may have taken me months and months to get started , and I had to let go of my perfectionism, and I had to teach myself how to hand-quilt, but it's finally finished! 
I love, love, love this quilt. I love the fabrics and the fabric choices Great-grandma made, and how different they are from ones I would normally choose.  It's not a matchy-matchy quilt.  I was even able to find a large piece of fabric in her stash, which I used for the backing and binding. 
 
I love how the hand-quilting looks great with these blocks, it really makes this quilt and helps create a vintage scrap-quilt look.  I decided that this quilt was already busy enough without complicated quilting (and, I admit, this was only my second quilt doing hand-quilting, so I didn't want to try anything too ambitious).  I just did simple outline stitching about 1/4" from all the seams.  
So far, BT loves it, too ;)

-Lily

Monday, November 25, 2013

Crochet Block Stitch Baby Blanket

I actually finished this project before BT was born, but I've been a little busy (translation:  crazy busy, with barely contained chaos and dirty dishes piled everywhere) with three little ones and haven't recorded any of my projects recently.  
I love how this blankie turned out!  I found this block stitch pattern and thought it would look so cute in pastels, with just a little white peeking through between the double crochets.  Since we didn't find out the gender of the baby, I wanted this blanket to work for a boy or girl, so I used pink, blue, and green for the colors.  And, it actually turned out just like I pictured it.  That definitely does not always happen, so I am super excited! 


The other two boys love, love, love their blankies that I crocheted for them, so hopefully BT will, too.  I love seeing them enjoy the things I stitched with love.  As you can see, the older boys were having fun during the photo shoot, so this blanket it already kid-approved.  It was hard to get them to but the blankie down so I could get a few pics. 
I mostly followed the block stitch pattern, with a few modifications. 

For materials, I used a size G crochet hook and Caron simply soft yarn (medium weight 4), one skein each of white,  soft blue, soft green, and soft pink.  Finished size:  36" x 32"

When I tested my gauge, 4" = 5 groups of 3 dc.  To modify the pattern, you just need to chain a multiple of 4, plus 3.  Then, you can make this pattern any size you want.

 With green, chain 171, turn.  Sc in 2nd chain and in each chain across, turn.  Continue in block stitch pattern, starting with Row 3.  Continue working in block stitch, working the chain rows in white.  Work the dc rows in green, pink, blue.  

I finished the center with a row of white, then worked a row of sc around the entire blanket.  Then I finished with a simple scalloped edging.

Monday, July 29, 2013

Half-Square Triangles Tutorial: Eight at a Time

A few months ago, I wrote a tutorial on making half-square triangles two at a time.  That technique works great if you only need a dozen or so.  However, I had plans to make a baby quilt entirely out of half-square triangles, and I wanted to make them more efficiently.  I discovered a way to make eight at a time, which worked great for a project where I needed so many.

The quilt is all assembled, and I'm so excited, it looks awesome!  I just basted it, and it's next in line for hand-quilting after my great-grandma's bow-tie blocks quilt.  Now, I have to share how I made all these half-square triangles without losing my mind.
1.  First, from both fabrics cut squares double the size you want your half-square triangles. (I'm using white and blue fabrics here.)

I wanted my squares to be 3" in the quilt, so I needed them to be 3.5" before assembling.  I like to make my half-square triangles half an inch larger than I need them so that I can square them up first, so I made them 4" square.  For 4" half-square triangles, I cut 8" squares from both of my fabrics. 


2.  Next, mark sewing and cutting lines.  I usually mark the lighter fabric so it's easier to see.  

On the wrong side, mark the middle of the square both horizontally and vertically.  Then draw diagonal lines from corner to corner.  Pin your two fabrics right sides together. 

3.  Sew  1/4" away on both sides of both diagonal lines.  You should have 4 stitching lines.

(oops, I forgot to take a pic before cutting, but you can see my stitching here)


 4.  Cut on all four marked lines.  You should now have 8 triangles with stitching on the long side.

 5.  Open up your triangles and press the seam toward the darker fabric.  

6.  Use a rotary cutter to trim all the squares to the correct size.  This is easiest with a small square ruler that has a 45 degree angle marked.

Line up the 45 degree angle along the triangle edge.  It's important to line up the angle so the points of your triangles match when piecing them together. 

Trim a little from all four sides to square it up.  Here, I'm trimming to 3.5".  As you can see in the picture, you won't be trimming off very much and you might be tempted to skip this step.  Don't skip it, or your patchwork will be all wonky and very frustrating.

One half-square triangle ready for piecing!
Even making these eight-at-a-time is quite a bit of work.  But, they make beautiful patchwork!  I can't wait to get to work on the quilting.

-Lily


Monday, July 22, 2013

Cloth Baby Wipes Tutorial

We've been using cloth wipes for several years now, and we love them.  No chemicals, they don't dry out skin, and they're super cheap.  Sometimes I think we save just as much on wipes as we save on diapers, especially when I had a breastfeeding baby.  

Since we were already using cloth diapers, using cloth wipes is actually easier than disposables.  We have the whole diaper system set up anyway.  I just have a spray bottle of water at my changing table, and I moisten the wipes I need at each diaper change.  
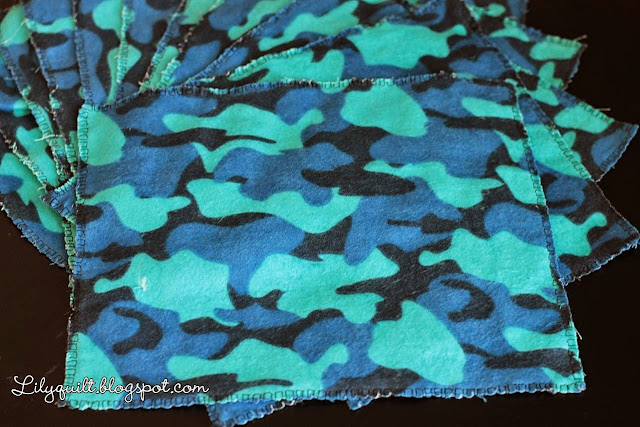
We have a whole bunch of wipes already, but some of them are getting pretty worn from constant use.  Plus, we have a newborn on the way, who will go through plenty of wipes, so when my mother-in-law gave me some flannel scraps, I knew the perfect project!  

Maybe I shouldn't get this excited over poop rags, but these were free, which I love.  And, they're so easy to make, I whipped out this whole batch in no time.  I hate all my unfinished projects sitting around, so it felt good to finish something.

Let's get sewing:
1.  Cut your flannel into 9 x 8 inch rectangles.  Don't worry about making it perfect, they are just wipes.

They look a little big, but flannel will shrink, and you do not want too-small baby wipes.

2.  If you have a serger, you can just serge the edges.  If you have a regular sewing machine like me, choose an overlock stitch.  You can see I used stitch "M" on my machine, which shows a little pic of this kind of stitch.

3.  Sew around the edges of all the wipes.  Your needle should be just off the edge of the fabric on the right-hand side.  Overlap the stitches where you start and end, and backstitch.
Done!  It's not the prettiest sewing I've ever done, but hey, they're for my baby's bum, so good enough :)

-Lily