Showing posts with label sewing. Show all posts

Monday, July 29, 2013

Half-Square Triangles Tutorial: Eight at a Time

A few months ago, I wrote a tutorial on making half-square triangles two at a time.  That technique works great if you only need a dozen or so.  However, I had plans to make a baby quilt entirely out of half-square triangles, and I wanted to make them more efficiently.  I discovered a way to make eight at a time, which worked great for a project where I needed so many.

The quilt is all assembled, and I'm so excited, it looks awesome!  I just basted it, and it's next in line for hand-quilting after my great-grandma's bow-tie blocks quilt.  Now, I have to share how I made all these half-square triangles without losing my mind.
1.  First, from both fabrics cut squares double the size you want your half-square triangles. (I'm using white and blue fabrics here.)

I wanted my squares to be 3" in the quilt, so I needed them to be 3.5" before assembling.  I like to make my half-square triangles half an inch larger than I need them so that I can square them up first, so I made them 4" square.  For 4" half-square triangles, I cut 8" squares from both of my fabrics. 


2.  Next, mark sewing and cutting lines.  I usually mark the lighter fabric so it's easier to see.  

On the wrong side, mark the middle of the square both horizontally and vertically.  Then draw diagonal lines from corner to corner.  Pin your two fabrics right sides together. 

3.  Sew  1/4" away on both sides of both diagonal lines.  You should have 4 stitching lines.

(oops, I forgot to take a pic before cutting, but you can see my stitching here)


 4.  Cut on all four marked lines.  You should now have 8 triangles with stitching on the long side.

 5.  Open up your triangles and press the seam toward the darker fabric.  

6.  Use a rotary cutter to trim all the squares to the correct size.  This is easiest with a small square ruler that has a 45 degree angle marked.

Line up the 45 degree angle along the triangle edge.  It's important to line up the angle so the points of your triangles match when piecing them together. 

Trim a little from all four sides to square it up.  Here, I'm trimming to 3.5".  As you can see in the picture, you won't be trimming off very much and you might be tempted to skip this step.  Don't skip it, or your patchwork will be all wonky and very frustrating.

One half-square triangle ready for piecing!
Even making these eight-at-a-time is quite a bit of work.  But, they make beautiful patchwork!  I can't wait to get to work on the quilting.

-Lily


Monday, July 22, 2013

Cloth Baby Wipes Tutorial

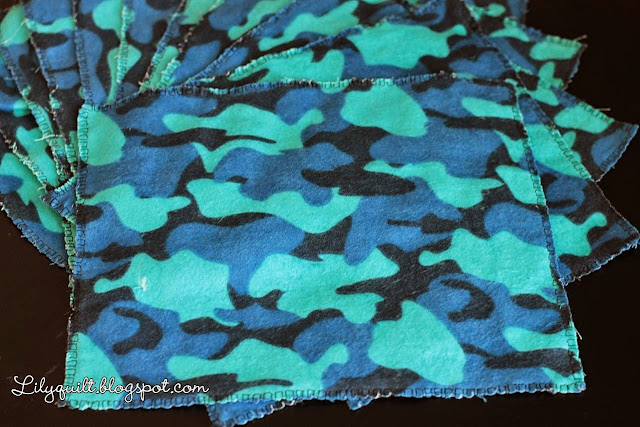
We've been using cloth wipes for several years now, and we love them.  No chemicals, they don't dry out skin, and they're super cheap.  Sometimes I think we save just as much on wipes as we save on diapers, especially when I had a breastfeeding baby.  

Since we were already using cloth diapers, using cloth wipes is actually easier than disposables.  We have the whole diaper system set up anyway.  I just have a spray bottle of water at my changing table, and I moisten the wipes I need at each diaper change.  
We have a whole bunch of wipes already, but some of them are getting pretty worn from constant use.  Plus, we have a newborn on the way, who will go through plenty of wipes, so when my mother-in-law gave me some flannel scraps, I knew the perfect project!  

Maybe I shouldn't get this excited over poop rags, but these were free, which I love.  And, they're so easy to make, I whipped out this whole batch in no time.  I hate all my unfinished projects sitting around, so it felt good to finish something.

Let's get sewing:
1.  Cut your flannel into 9 x 8 inch rectangles.  Don't worry about making it perfect, they are just wipes.

They look a little big, but flannel will shrink, and you do not want too-small baby wipes.

2.  If you have a serger, you can just serge the edges.  If you have a regular sewing machine like me, choose an overlock stitch.  You can see I used stitch "M" on my machine, which shows a little pic of this kind of stitch.

3.  Sew around the edges of all the wipes.  Your needle should be just off the edge of the fabric on the right-hand side.  Overlap the stitches where you start and end, and backstitch.
Done!  It's not the prettiest sewing I've ever done, but hey, they're for my baby's bum, so good enough :)

-Lily

Thursday, April 11, 2013

Reversible Two-in-One Little Girl Skirt

As we all know, I have two little boys, so I always love a chance to sew for little girls.  One of Buddy's friends turned three, and I whipped up this fast and easy skirt for her.  The beauty of this skirt is, it's actually two skirts in one!  I've made skirts similar to this one before, and it doesn't take any extra effort to make it reversible, just a little careful planning (which I have conveniently done for you). 
Another advantage is that this skirt is double layered.   Many little-girl skirt patterns are not lined, they just use a single layer of cotton fabric.  In my experience, a single layer is too see-through to make a good skirt.  Last time I made a similar skirt, I lined it with white cotton.  Then it dawned on me:  if I had used patterned fabric, the skirt would be reversible! 

This skirt is a great beginner project, it's really just a few straight seams and comes together quickly.  The hardest part is deciding which two cute fabrics to use! 

I made mine for a three-year-old, the final measurements were 18 inch waist and 11.5 inch length.  It's pretty easy to adjust the measurements, though, if you're making this for a younger or older girl.

What you need:
  • Fabric A, cut 14" by 42"
  • Fabric B, cut 11.5" by 42"
  • 19" length of 3/4" elastic
  • Coordinating thread, I used Coats and Clark All-Purpose
If you want to adjust the skirt length
Cut Fabric B the desired length.  Then cut Fabric A 2.5" longer.  For example, I wanted an 11.5" length, so I cut Fabric B 11.5" x 42".  Then I cut Fabric A, 14" x 42". 

For the waist, I just added 1" to my final measurement for the elastic.  I wanted an 18" waist, so I cut my elastic 19". 

Let's get sewing:

 1. Pin the 14" ends of Fabric A right sides together.  Sew with a 1/2" seam allowance.  You should now have a tube.  Press the seam open.  

2.  Pin the 11.5" ends of Fabric B right sides together.  Sew with a 1/2" seam allowance.    Press the seam open. Your fabrics should look like the pic below:  Fabric A is the floral and Fabric B is the yellow gingham.

3.  Turn Fabric B right-side-out.  Slide Fabric B over Fabric A, lining up the seams.  The two fabrics should be wrong sides together.  You should have about 1" of Fabric A showing at the bottom and 1.5" of Fabric A showing on top.

 4. To form the bottom hem, press and pin Fabric A on top of Fabric B.  Press 1/4", then 3/4".  Topstitch 1/8" from the pressed edge.  You should be sewing through both fabrics. 

5.  To form the casing for the elastic, press the top of Fabric A in 1/2", then 1".  Topstitch 1/8" from the pressed edge, leaving a 3" opening in the back.   Again, you should be sewing through both fabrics.  Use a safety pin to thread the elastic through, making sure it doesn't get twisted.

6.  Overlap the ends of the elastic by 1/2" and sew together securely.  Then tuck the elastic into the opening, fold down Fabric A, and topstitch the opening closed.  Make sure you don't catch the elastic as you sew.


And that's it, six steps and you've made two adorable little girl skirts!

-Lily


Linked up at some of the great blogs on my sidebar

Friday, February 1, 2013

Quilted Words for a Flannel Board (Tutorial)

I made these quilted words as a custom order on Etsy several months ago, and this tutorial has been sitting around way too long on my computer.  It's such a cute idea, and I definitely plan to make a set for my boys when they're a little older.  I love, love, love these quilted words, and as a bonus they'll be so fun for young readers.

I don't actually have a giant flannel board, but I may have to make one just for this.  If you don't have a giant flannel board either, maybe you could buy a large flannel blanket and play on that.  Or, you could just lay the words out on the floor.
 Part of the fun is the whimsical shapes and bright, bold fabrics!  If you're feeling adventurous, you could even try triangles, circles, or hexagons rather than sticking to boring old rectangles :)  I think another fun option would be to make an entire alphabet set, so little ones can learn to spell out words.


 What you need:
  • Assorted cotton prints
  • Batting
  • Felt for backing
  • Velcro (optional)
  • Fusible web
  • All-purpose thread


Let's get sewing
1.  Cut your cotton prints, felt, and batting into shapes for your words/letters.  I made mine into rectangles about 11 x 5 inches and 13 x 7 inches for the long words.  Any smaller and I couldn't fit a whole word on them.  If you're making short words or individual letters, you can cut them smaller.  (I cut my squares about 7-8".)  These measurements include 1" on each side for a 1/2" seam allowance. 

2.  If you are making words for a flannel board, I suggest sewing one or two 2" pieces of the "hook" side of hook-and-loop tape (velcro) to your felt backing, which will help it stick to the flannel.  Sew the velcro about 1" down from the top of the felt and 1-2" from the sides.

3.  Draw the letters for your words.  If you look at the pictures, you can see I made some "rounded" letters, but if I did this project again I'd use all straight-edged letters like in the pic below.  The round letters were much more difficult to zig-zag stitch in step 8. 

I free-handed my letters, but you could also print off letters in a huge font on your computer, then trace them on the fusible web. (Make sure to trace the reverse of the letters--see my "F" below).  Peel off the paper backing and stick them on the wrong side of your fabric.

4.  Cut out the letters, peel off the paper, and arrange them in the center of the rectangle.  I tried to leave space at the top so my letters wouldn't overlap the velcro when I assembled the words.  You'll be sewing the letters down in step 8, and it's annoying to sew over velcro.  Follow the directions on your fusible web to fuse the letters to the fabric.

5.  Make an "inside-out" quilt sandwich:  cotton with letters facing up, felt right-side down (with velcro against the letters), and batting on top.

6.  Sew around the rectangle with a 1/2" seam allowance.  Leave a 3" opening in the bottom for turning.  Clip the extra fabric at the corners so it will lay flat after turning.

7.  Turn out, then topstitch 1/4" from the edge to sew the opening shut and to help the word lay flat.

8.  Using a zig-zag stitch, sew around the edges of all the letters.  This secures the letters, and it also functions as quilting.

9.  If you want, you can also add some cute decorative quilting with a straight stitch.
Repeat steps 1-9 to make a bunch of cute words that your kids will love to play with again and again!
-Lily


Linked up at some of the great blogs on my sidebar!

Tuesday, January 15, 2013

DIY How to Patch Jeans

For the last three years I've had little boys to chase and play with on the floor.  I find myself crawling, crouching, and bending all day long.  Of course I love playing with my little guys, but it is very hard on the knees in my jeans.  Most of my "everyday" pants that I wear around the house have holes worn through the knees.  I guess it's trendy to have holes in your jeans, but some of my holes keep getting bigger and bigger as I continue to crawl around on the floor every day.  And, it's really cold to walk around with two giant holes in your pants when it's snowing outside!  

Rather than tossing all my holey jeans, I decided to try and patch them.  But, I remember when my mom used to patch my pants when I was a kid...let's just say it was anything but cute.  I wanted to still be able to wear my favorite jeans out of the house, so I had to find a creative way to patch them that didn't make them ugly.  
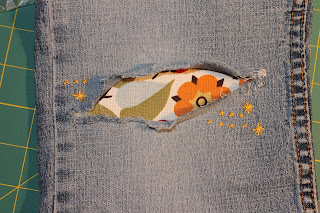
I found my solution on Pinterest (of course!), where I found this great tutorial on how to cutely patch jeans. When I tried it on my first pair of pants, I followed the tutorial's directions.  First, I used a double-sided fusible to bond the patch fabric to the inside of the jeans. 
 Then I used another layer of fusible web to bond a denim patch behind the fabric to add extra stability.  Finally, I added some cute embroidery.
 The problem was, after just one or two washings the inside of my jeans looked like this:
There were several drawbacks to this method:
1. The fusible web I used didn't bond the fabric strongly enough
2. I'd have to add a lot more embroidery to secure the patch.
3.The edges of the patch were already starting to fray.  (I guess I could have pinked the edges to help with this problem)
4.  Using a fusible web made the patch too stiff and uncomfortable to wear.
5.  The embroidery floss recommended wasn't strong enough for heavy use, and it started to fray.

I decided to try again on another pair of pants without using any fusible web.  I was much happier with the results this time, so here's my version of a cute jeans patch:

What you'll need:
  • 1 pair of holey jeans
  • 1 scrap of bright patch fabric
  • 1 scrap of corderoy (or other medium-weight material to back the patch)
  • Coordinating thread (I used a fun rainbow thread)
  • Sturdy needle for hand-sewing through denim 
Let's get mending:

1. Cut a piece of fabric and a piece of corderoy, about 2" wider and longer than your hole.  I used a zig-zag stich to sew the two patch fabrics together.  This will prevent the fabrics from unravelling.

2.  Pin the patch to the inside of the jeans, centering the fabric over the hole. 

3.  Turn the jeans right-side-out and hand-sew the patch to the jeans.  If you have thinner thread, you'll probably want to double it so it's sturdy enough to hold the patch on.  I used a backstitch about 1/4" away from the edges of the hole to securely attach the patch.

You could also add some decorative embroidery stitches like I did on my first pair of jeans.
Have fun looking cute, saving money, and rescuing your favorite jeans from the scrap pile!
-Lily

Linked up at some of the great blogs on my sidebar!

Monday, December 31, 2012

Tutorial: Spider PJ's from a Men's T-Shirt (Part 2)

Several months ago, I found a fun tutorial on how to make little man PJ's from a men's X-large t-shirt.  I thought it was an awesome idea, but I didn't follow the tutorial exactly when I made mine.  So, I thought I'd show how I made my little guy his awesome spider pajamas!

I posted the first part of this tutorial over a month ago, and time has somehow gotten away from me over the holidays, so I'm finally posting the second half.  In the first part of the tutorial, I showed how I made the raglan shirt.  Here, I'll show how I made the pants.
What you need:
  • XL men's shirt (plenty of material for size 2T PJ's)
  • pair of pajamas to use as pattern pieces
  • matching thread
  • ball-point needle for sewing knits
  • 1/2 yard of 3/4 inch elastic

Let's get sewing:

1.  Lay out the men's t-shirt flat.  Place your pattern pajama pants on top of one sleeve, lining up the hem of the pants and the hem of the sleeve.  I used the whole width of the sleeve, so I didn't have to worry about sewing the inseam of the pants.  I cut about 2 inches above the top of the pants to allow enough fabric to form the elastic casing.

Repeat this step on the other sleeve.

2.  Turn one pant leg inside-out.  Place the right-side out leg inside the other (it should look like the pic).  Match the U-shaped seam and sew, using a 1/2 inch seam allowance.

I originally used a straight stitch, but then did some reading and found that a lot of people have problems with straight stitches popping on knits.  So, I added a zig-zag stitch, too. (I don't think this was the best solution, but using this method I didn't have to actually make a decision about which stitch to use.)

3.  Turn the pants inside-out.  Fold down the top edge 1/2", then another 1" to form the casing.  Topstitch 1/8" away from the edge, leaving a 3" opening. 

4.  Use a safety pin to thread the elastic through. 

5.  Overlap the elastic ends 1/2" and sew together.  Tuck inside the casing and sew closed. 

Turn your pants right-side out, and your little man PJ's are ready to go!
-Lily

Linked up at some of the great blogs on my sidebar!