Showing posts with label quilting. Show all posts

Tuesday, January 28, 2014

Teacher Gift: Class Signature Quilt

I've been so bad about posting all my quilt finishes recently.  I don't want to forget this signature quilt, because I love this idea for a teacher appreciation gift!  The customer convinced all the parents in her child's kindergarten class go in together for a gift.  Rather than everyone buying a small (and often rather useless) gift, they all went in together on these awesome quilts!  The customer picket out and bought the frog fabric.  Then she secretly had all the kids in her child's kindergarten class sign it in two different places with a fabric maker, then sent it to me. 

To assemble the quilt, all I did was add borders with corner squares.  I wanted the focus to stay on the center panel and the adorable 5-year-old signatures, so I kept the piecing simple and used solids for the border.  After basting, I added teacher's name and the year with fusible web.  Then I appliqued with a zig-zag stitch. 
I outline-quilted the border and corner squares.  I also highlighted all the signatures with quilted boxes.  Then I decided it needed more quilting, so I outlined some of the fun frogs, too.

I love how the outlined signatures turned out! The back really shows off the effect of the random-box quilting:

I also made a similar wall-hanging sized quilt for the teacher's aid the same way as the larger quilt.  I just added hanging tabs, and did a turn-out and topstitch finish on the edges rather than binding. 


Monday, July 29, 2013

Half-Square Triangles Tutorial: Eight at a Time

A few months ago, I wrote a tutorial on making half-square triangles two at a time.  That technique works great if you only need a dozen or so.  However, I had plans to make a baby quilt entirely out of half-square triangles, and I wanted to make them more efficiently.  I discovered a way to make eight at a time, which worked great for a project where I needed so many.

The quilt is all assembled, and I'm so excited, it looks awesome!  I just basted it, and it's next in line for hand-quilting after my great-grandma's bow-tie blocks quilt.  Now, I have to share how I made all these half-square triangles without losing my mind.
1.  First, from both fabrics cut squares double the size you want your half-square triangles. (I'm using white and blue fabrics here.)

I wanted my squares to be 3" in the quilt, so I needed them to be 3.5" before assembling.  I like to make my half-square triangles half an inch larger than I need them so that I can square them up first, so I made them 4" square.  For 4" half-square triangles, I cut 8" squares from both of my fabrics. 


2.  Next, mark sewing and cutting lines.  I usually mark the lighter fabric so it's easier to see.  

On the wrong side, mark the middle of the square both horizontally and vertically.  Then draw diagonal lines from corner to corner.  Pin your two fabrics right sides together. 

3.  Sew  1/4" away on both sides of both diagonal lines.  You should have 4 stitching lines.

(oops, I forgot to take a pic before cutting, but you can see my stitching here)


 4.  Cut on all four marked lines.  You should now have 8 triangles with stitching on the long side.

 5.  Open up your triangles and press the seam toward the darker fabric.  

6.  Use a rotary cutter to trim all the squares to the correct size.  This is easiest with a small square ruler that has a 45 degree angle marked.

Line up the 45 degree angle along the triangle edge.  It's important to line up the angle so the points of your triangles match when piecing them together. 

Trim a little from all four sides to square it up.  Here, I'm trimming to 3.5".  As you can see in the picture, you won't be trimming off very much and you might be tempted to skip this step.  Don't skip it, or your patchwork will be all wonky and very frustrating.

One half-square triangle ready for piecing!
Even making these eight-at-a-time is quite a bit of work.  But, they make beautiful patchwork!  I can't wait to get to work on the quilting.

-Lily


Saturday, May 18, 2013

Buddy's Finished Quilt

Welcome, everyone from Blogger's Quilt Festival!  If you've never stopped by before, I'm Lily, a mommy with two young sons who loves quilting (and all things handmade).  I made this twin-sized quilt for my 3-year-old son, Buddy.  He loves being tucked in every night under this special quilt that Mommy made just for him, which warms my mommy heart :)


Many of the pinwheel blocks were made by friends at a local quilting group and given to me when Buddy was just a tiny baby.  There would have been enough blocks for a baby quilt, but I already had several of those.  Instead, I decided to make a twin-sized quilt for when he eventually grew into a big-boy bed. 
I loved these pinwheel blocks made with 1930s reproduction fabrics, but I wanted to make the quilt look a little more modern.  I also wanted it manly enough that my son could use it for years to come, which is why I alternated the pinwheels with solid blue blocks.  The result was even better that I pictured:  a very modern-looking graphic quilt, with pops of color from the 1930s prints.
For the quilting, I found a cross quilting pattern in a pattern book at the library.  (Side note:  I returned the book and now can't remember the book or the name of the pattern.  If anyone knows, please share!)  I love how this pattern was so easy to quilt on my home machine, since it only used straight lines.
 
I decided to make the borders and binding with the same blue as the center blocks, to continue the simple, two-color feel of this quilt.  I also used a simple blue backing that really showed off the quilting.
Many thanks to Amy over at Amy's Creative Side, this is my 2nd Blogger's Quilt Festival, and it's so fun and inspiring to see the many awesome quilts linked up!


-Lily

Thursday, February 28, 2013

Great Grandma's quilt blocks

Last year, my great-grandma passed away, and since hardly anyone in the family sews, I inherited a big box full of random fabric.  I really don't know how long it's all been sitting in that box.  But, from the vintage look and feel of the fabrics, (not to mention the dust layers on the box) I think it's safe to say several decades.  Then, buried in the middle of her stash, jackpot!  I found all these old quilt blocks she had made and never put together into quilts.  Some of the bow-tie blocks are even hand-pieced.  I love thinking about my grandma sewing together these same fabrics and the story behind them--how old she was, what was happening in the world when she made them.  I love this generational connection that quilts can create.  I'll be working with these same blocks to finish her quilts years later.  And, I plan on making a baby quilt for my next little one, so this quilt will connect five generations in my family.

I haven't been doing any quilting or sewing recently, but I've been wanting to start a new project and these blocks might actually get me excited enough to start.  I want to make a lap quilt with these white-background blocks.  I love how vintage and antique quilts use fabrics and combinations that I would never choose today.   Look at the two below:  green triangles and red floral?  weird brown squares and pick floral??  It's hard to tell if Grandma had really different tastes than I do, or if she was just being thrifty and using up all the fabric she had on hand.  Either way, these blocks have a completely different look than I would ever create.
I don't know what to call these blocks.  Does anyone know the name of this pattern?? 

These are some of the squares I want to make into a baby blanket.  Again, very different fabric choices than I usually make, but that adds to the charm and beauty of using vintage blocks!

The slowest part of starting these projects has been planning the quilting.  I decided when I first saw the blocks that I want to learn to hand-quilt, to add to the vintage feel.  That has taken some time, and I really, really need to keep practicing so that my quilting will do justice to Grandma's quilts!
-Lily 


Linked up at some of the great blogs on my sidebar

Friday, February 1, 2013

Quilted Words for a Flannel Board (Tutorial)

I made these quilted words as a custom order on Etsy several months ago, and this tutorial has been sitting around way too long on my computer.  It's such a cute idea, and I definitely plan to make a set for my boys when they're a little older.  I love, love, love these quilted words, and as a bonus they'll be so fun for young readers.

I don't actually have a giant flannel board, but I may have to make one just for this.  If you don't have a giant flannel board either, maybe you could buy a large flannel blanket and play on that.  Or, you could just lay the words out on the floor.
 Part of the fun is the whimsical shapes and bright, bold fabrics!  If you're feeling adventurous, you could even try triangles, circles, or hexagons rather than sticking to boring old rectangles :)  I think another fun option would be to make an entire alphabet set, so little ones can learn to spell out words.


 What you need:
  • Assorted cotton prints
  • Batting
  • Felt for backing
  • Velcro (optional)
  • Fusible web
  • All-purpose thread


Let's get sewing
1.  Cut your cotton prints, felt, and batting into shapes for your words/letters.  I made mine into rectangles about 11 x 5 inches and 13 x 7 inches for the long words.  Any smaller and I couldn't fit a whole word on them.  If you're making short words or individual letters, you can cut them smaller.  (I cut my squares about 7-8".)  These measurements include 1" on each side for a 1/2" seam allowance. 

2.  If you are making words for a flannel board, I suggest sewing one or two 2" pieces of the "hook" side of hook-and-loop tape (velcro) to your felt backing, which will help it stick to the flannel.  Sew the velcro about 1" down from the top of the felt and 1-2" from the sides.

3.  Draw the letters for your words.  If you look at the pictures, you can see I made some "rounded" letters, but if I did this project again I'd use all straight-edged letters like in the pic below.  The round letters were much more difficult to zig-zag stitch in step 8. 

I free-handed my letters, but you could also print off letters in a huge font on your computer, then trace them on the fusible web. (Make sure to trace the reverse of the letters--see my "F" below).  Peel off the paper backing and stick them on the wrong side of your fabric.

4.  Cut out the letters, peel off the paper, and arrange them in the center of the rectangle.  I tried to leave space at the top so my letters wouldn't overlap the velcro when I assembled the words.  You'll be sewing the letters down in step 8, and it's annoying to sew over velcro.  Follow the directions on your fusible web to fuse the letters to the fabric.

5.  Make an "inside-out" quilt sandwich:  cotton with letters facing up, felt right-side down (with velcro against the letters), and batting on top.

6.  Sew around the rectangle with a 1/2" seam allowance.  Leave a 3" opening in the bottom for turning.  Clip the extra fabric at the corners so it will lay flat after turning.

7.  Turn out, then topstitch 1/4" from the edge to sew the opening shut and to help the word lay flat.

8.  Using a zig-zag stitch, sew around the edges of all the letters.  This secures the letters, and it also functions as quilting.

9.  If you want, you can also add some cute decorative quilting with a straight stitch.
Repeat steps 1-9 to make a bunch of cute words that your kids will love to play with again and again!
-Lily


Linked up at some of the great blogs on my sidebar!

Monday, November 19, 2012

Advent Calendar Tutorial

Sometimes, projects can sit around waaaay too long.  For example, I started this advent calendar last November...and I just finished it.  But, it's the end result that matters, right?  And it did turn out really cute, so I'm glad I didn't try to rush it.  Don't be alarmed, it's a pretty simple project.  About 98% of the time I took to finish it was spent procrastinating.  
Now all I have to do is make a felt marker to move from pocket to pocket.  Hopefully that doesn't take me until next Christmas!  (Update: Check out the tutorial for the felt star and baby Jesus markers I made)

What you need:
  • 1 main fabric, 24 x 22 inches
  • 1 backing fabric, 24 x 22 inches
  • 1 piece of batting, 24 x 22 inches
  • 4 pieces of fabric 8 x 8 inches, for the tabs.  I don't recommend a directional fabric, or you might have upside-down trees like me, oops.
  • 5 pieces of white fabric, 9 x 20 inches, for the pockets
  • Red felt
  • White and green embroidery floss
Let's get sewing:  I used all-purpose white thread and a 1/2" seam allowance.

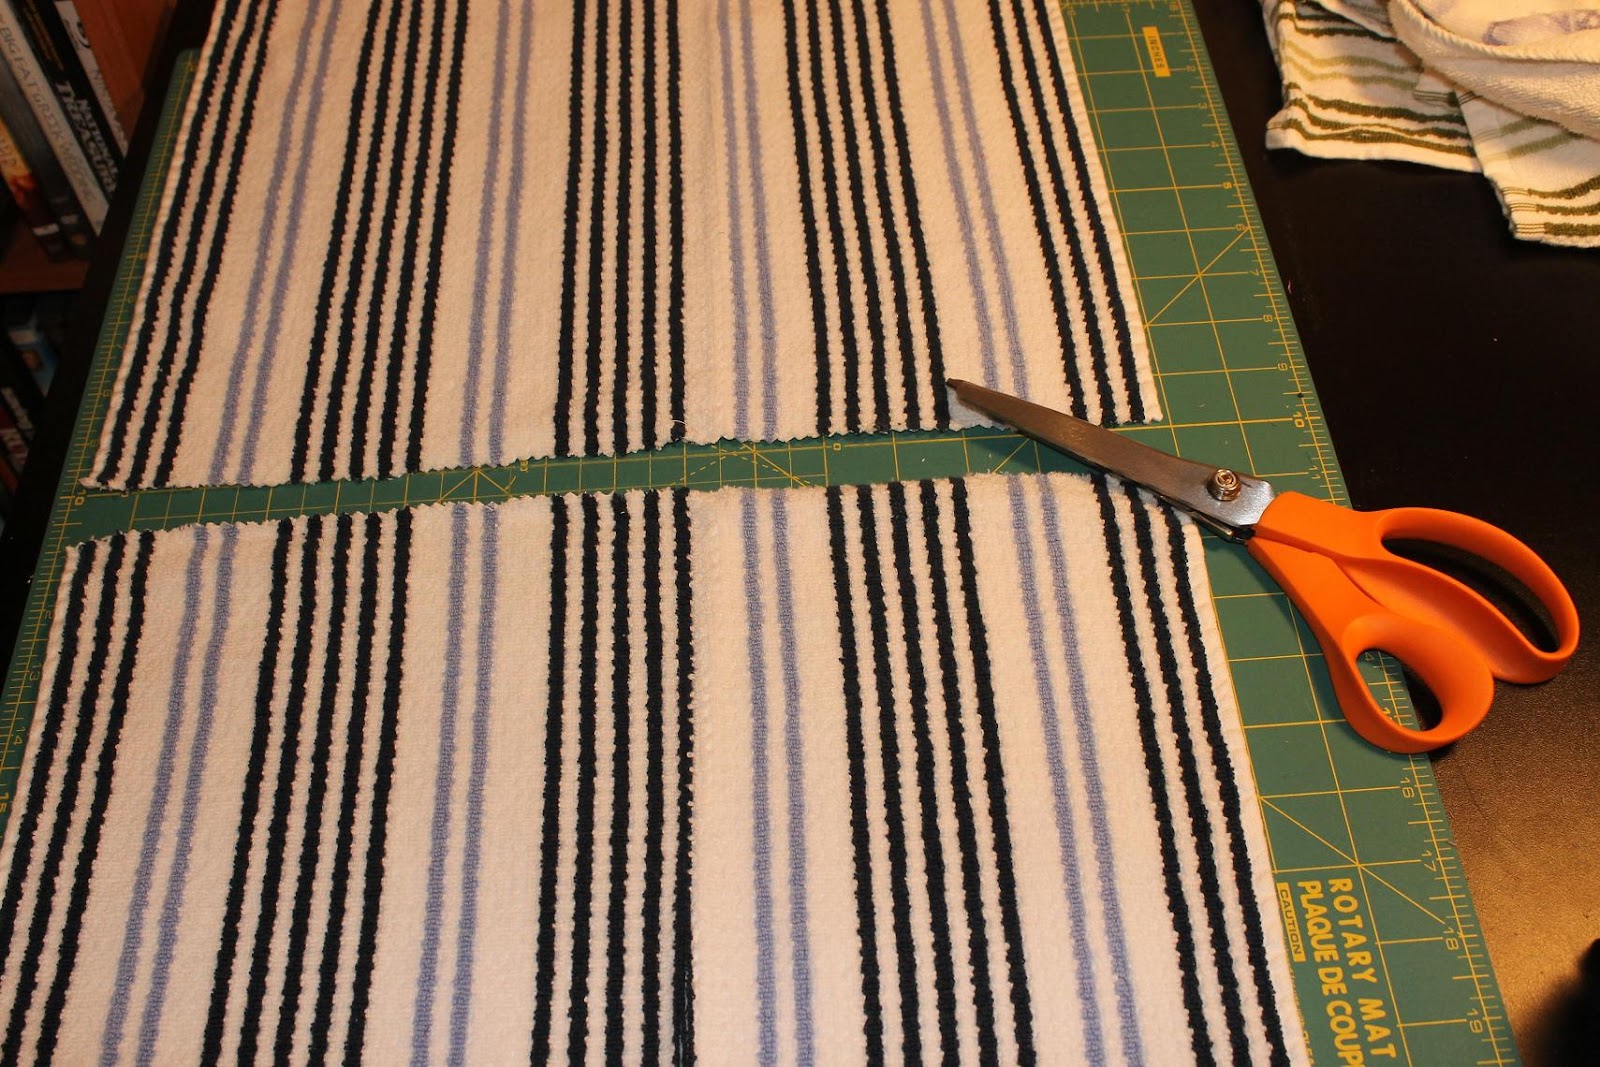
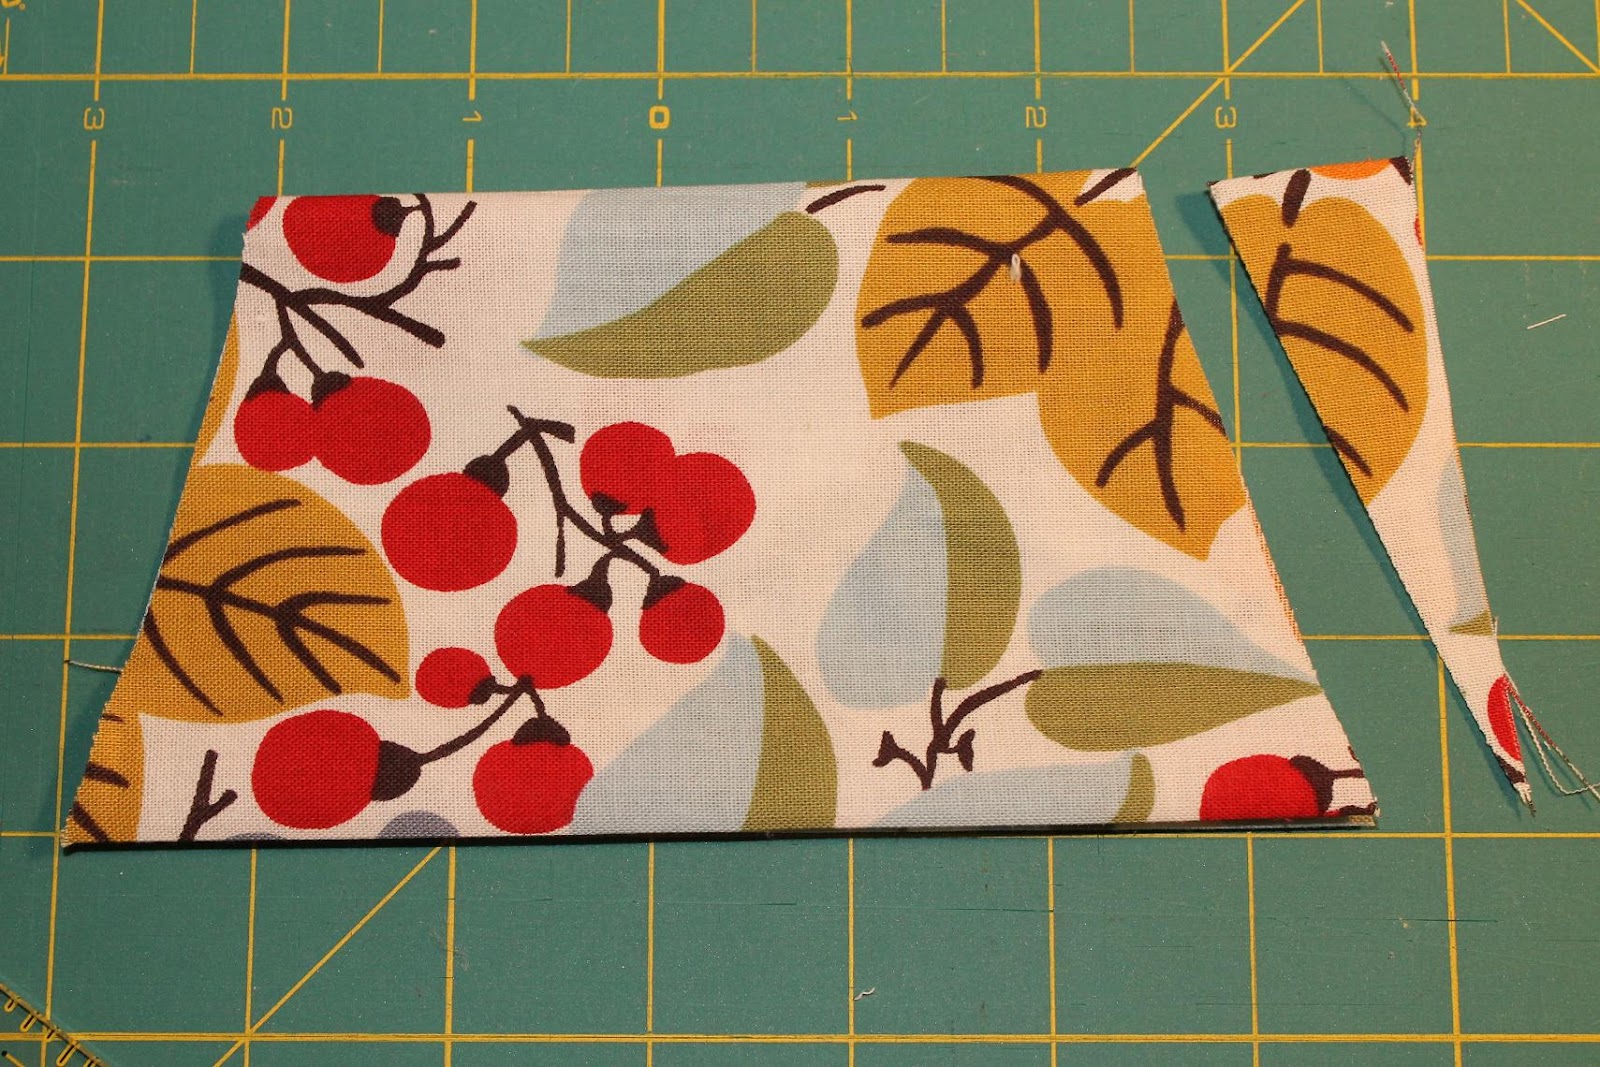
1.  First, make the pockets.  I decided it was a lot easier to make 5 long pockets and divide them with quilting lines, rather than sew on 25 separate pockets.  Fold your rectangles in half, right sides together, so that you have 4.5 x 20" rectangles.  Sew around the 3 open edges, leaving a 3" opening for turning.  Clip your corners (see pic) so they'll lay flat when turned out.
Turn out the pockets, press, and topstitch 1/8" and 1/4" away from the folded edge.

2.  Next, make the tabs.  Fold the squares in half, right sides together.  Sew along the open long side of the rectangle formed.  Turn out and press. 

3.  Place your backing and main fabrics right sides together, and place the batting on top.  Pin the the tabs along a short end.  Place between the main and backing fabrics, aligning the raw edges.  Place the two outer tabs 1" from the edge and leave about 2.5" between tabs.

Sew around all four edges, leaving a 5" opening in the bottom for turning.  Turn out, then topstitch 1/4" and 1/2" away from the edge.

Your calendar should now look like this:

4.  Cut out 40 1.5 x 2.5" rectangles from red felt, then cut out all the numbers by hand.  (I started with rectangles because it helped me keep the numbers a consistent size.)

5.  Lightly mark the pockets about every 3 3/4"--that's where the dividing lines for the pockets will be.  Use these lines to help center your numbers.

I couldn't decide whether to use white or green thread, a running or blanket stitch, so I used all of them to attach my numbers.  You can use your preferred hand stitch, or even attach the numbers by machine.  I used 2 strands of embroidery floss.

6.  Now attach your pockets to the calendar.  Note that in my pic, I don't have the numbers attached.  I added them after sewing the pockets to the calendar, which I think was a bad idea.  It was really hard to get my needle in and out behind the pocket without sewing through the main fabric.  If I did this again, I would attach the numbers first, then attach the pockets second.

Pin your pockets on the calendar and topstitch along three edges to attach, leaving the top of each pocket open. 

7.  Using your marks as a guide, topstitch about every 3 3/4" to form pockets.  I did this with hand-quilting, but you could also use a machine.
Have fun counting down and preparing for Christmas!
-Lily

Linked up at some of the great blogs on my sidebar

Monday, November 5, 2012

Hanging Kitchen Towels Tutorial

I love hanging towels in my kitchen, they look so much nicer than just shoving a towel through the stove handle.  Plus, my one-year-old thinks it's a really fun game to pull the towels off, and then Mommy puts them back up, then he pulls them down...all day.

I've seen a couple different versions of hanging hand towels recently--some with buttons, crochet loops, and other options, but I wanted to make some that could tie on and make a cute little bow.
These are cute, practical, and simple to make, so they would make perfect Christmas presents.  I made these for me, but I'll probably be making a few more sets as we head into the holidays.

What you need: for 2 hanging towels
  • 1 kitchen towel
  • 2 pieces of main fabric, 6.5 x 9"
  • 2 pieces of batting, 6 x 8"
  • For the ties, 4 pieces of bias tape, 18" each (or cut 1.5 x 18" strips and see straight-grain "bias tape" tutorial)
Let's get sewing:
1. Cut your towel in half so you have 2 pieces, 13 x 16" each.

2.  On the raw edge, make a large pleat in the center of the towel, so that the top of the towel measures 6" across.  Lay the pleat flat and pin.  Baste 1/8" from the edge to secure the pleat.

3.  On main fabric piece, press under short edges 1/2".  Fold in half, short ends together.  On the fold, mark 1" in from both sides.  Cut from the mark to the bottom edge.  Repeat on the other side.  You should have a trapezoid.

4.  Cut your batting the same way you cut your fabric in step 3.  Open your trapezoids and center the batting on the wrong side.

5.  Fold the batting and trapezoid over the pleated towel edge.  Sew 1/4" from the edge.  I used a triple-stitch to make it secure, since the towel hangs on this seam.  Make sure to catch the front and back of your fabric.

6. Quilt the fabric panel.  Here's a close-up of a finished towel so you can see one of the quilting patterns I did.  One set has concentric trapezoids, and the other has parallel lines about 1/2" apart.

 7.  Open your bias tape (or straight-grain tape, like I used.)  Press both short ends in 1/2".  Lay the open tape on the back of the main fabric.  Align the pressed short end with the top of the towel and align the raw edge to the main panel raw edge.  Baste the raw edges together 1/4" from edge.

8.  Now, fold the tape over  to the front of the main fabric.  Pin the tape in place.  Sew 1/8" from the edge, attaching the tape along the fabric edge, then continue along the tape to form the tie.

 You should now have a towel that looks like this!  Repeat steps 2-8 to make your 2nd towel.


-Lily

Link party some of the great blogs on my sidebar.