Monday, December 31, 2012

Tutorial: Spider PJ's from a Men's T-Shirt (Part 2)

Several months ago, I found a fun tutorial on how to make little man PJ's from a men's X-large t-shirt.  I thought it was an awesome idea, but I didn't follow the tutorial exactly when I made mine.  So, I thought I'd show how I made my little guy his awesome spider pajamas!

I posted the first part of this tutorial over a month ago, and time has somehow gotten away from me over the holidays, so I'm finally posting the second half.  In the first part of the tutorial, I showed how I made the raglan shirt.  Here, I'll show how I made the pants.
What you need:
  • XL men's shirt (plenty of material for size 2T PJ's)
  • pair of pajamas to use as pattern pieces
  • matching thread
  • ball-point needle for sewing knits
  • 1/2 yard of 3/4 inch elastic

Let's get sewing:

1.  Lay out the men's t-shirt flat.  Place your pattern pajama pants on top of one sleeve, lining up the hem of the pants and the hem of the sleeve.  I used the whole width of the sleeve, so I didn't have to worry about sewing the inseam of the pants.  I cut about 2 inches above the top of the pants to allow enough fabric to form the elastic casing.

Repeat this step on the other sleeve.

2.  Turn one pant leg inside-out.  Place the right-side out leg inside the other (it should look like the pic).  Match the U-shaped seam and sew, using a 1/2 inch seam allowance.

I originally used a straight stitch, but then did some reading and found that a lot of people have problems with straight stitches popping on knits.  So, I added a zig-zag stitch, too. (I don't think this was the best solution, but using this method I didn't have to actually make a decision about which stitch to use.)

3.  Turn the pants inside-out.  Fold down the top edge 1/2", then another 1" to form the casing.  Topstitch 1/8" away from the edge, leaving a 3" opening. 

4.  Use a safety pin to thread the elastic through. 

5.  Overlap the elastic ends 1/2" and sew together.  Tuck inside the casing and sew closed. 

Turn your pants right-side out, and your little man PJ's are ready to go!
-Lily

Linked up at some of the great blogs on my sidebar!

Wednesday, December 26, 2012

Easy-Peasy Cake Mix Cookies

Christmas might be over, but the holiday season is in full swing for us.  Our family still has several more parties over the next few days.  If you need something quick and easy to bake for a holiday get-together, these are the cookies for you!  They're super yummy, super easy, and fast.  Since you start with a boxed cake mix, you don't have to measure out flour, salt, baking powder, etc, which can save a lot of time.  And another bonus:  there's just one dirty bowl, rather than piles of dirty dishes.

What you need: (makes about 3 dozen)
  • 1 (2-layer) devils food cake mix
  • 8 oz package reduced fat cream cheese
  • 1 stick margarine
  • 1 egg
  • 1/2 tsp vanilla
  • powdered sugar

 Let's get Cooking:
1.  With a hand mixer (or by hand) cream the margarine and cream cheese together.  Add the cake mix, egg, and vanilla and mix until combined.  (Sometimes my dough is a little crumbly at this point.  Just add a splash of milk to help it stick together.)

2.  Roll the dough into 1 inch balls.  Roll the balls in powdered sugar just before baking.

3.  Bake in a preheated oven at 350 degrees for 12-15 minutes.  (Make sure not to overbake.  It's easy to do with chocolate cookies because you can't see them turning golden brown)
Mmmm, I can almost taste them now.  Enjoy, and Merry Christmas!
-Lily

Linked up at some of the great blogs on my sidebar.

Monday, December 17, 2012

Drawstring Bag Tutorial

 Ok, I'm officially in Christmas panic mode.  I still haven't finished shopping, I have tons of holiday baking to do, I haven't started wrapping, and I'm still sewing gifts...

 Yesterday I was whipping out several sets of my drawstring bags.  They make great gifts--quick to sew, super cute, and actually useful.  They fit perfectly over a mason jar, which is great for giving homemade goodies.

 As I was sewing, I realized I'd made the tutorial more complicated it needed to be.  There were several steps that I could simplify and make these even easier to make, so I thought I'd post an updated tutorial.
 What you need:  (for one drawstring bag)
  • 11 x 15 inch rectangle for outside, Fabric A 
  • 11 x 15 inch rectangle for lining, Fabric B
  • 5" diameter circle of Fabric B
  • 5" diameter circle of Fabric A
  • 24 inch piece of 1/2 inch ribbon
  • Thread to match
 Let's get sewing:  Use a 1/2" seam allowance.  In the photos, I'm sewing a blue bag (Fabric A) with a white lining (Fabric B)


1.  Fold both rectangles in half, right sides together, so you have 11 x 7.5 in. rectangles.

Pin the long sides at 2 inches and 1/2 inches from the ends as shown in the photo.  (I use color-coordinated pins.  I start at white and end at red.)  Sew between the pins, backstitching at both ends.


2.  Pin and sew the circle pieces to the rectangles, right sides together, to the ends with the 1/2" opening.  You can either match the bottoms, or you can swap your circles like the yellow and brown polka dot bag shown above.

3.   Turn Fabric A right-side out, then slip it inside your Fabric B. (You won't have a hole in your lining, just ignore that)

4.   Line up the top edges and the side seams.  Sew around the top edge, starting and stopping 1/2" from the V-shaped slit.


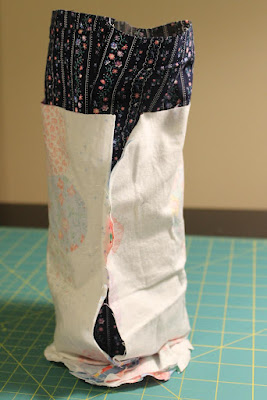
5.  Turn out through the V-slit.   Your bag should look like this:

6.   Tuck your Fabric B into Fabric A.  Tuck the V-slit edges under 1/2".  Topstitch 1/8" from the edge to close the opening.

7.   Fold down the top of the bag 3/4" to form the drawstring casing.  Remove the tray on your sewing machine and slide the bag over the end so you can easily sew the casing.  Topstitch 1/8" from the edge.

8.   Use a safety pin to thread the ribbon through the casing.  Make sure it isn't twisted, then knot the ends together.  Snip the ribbon ends at a diagonal, and you're finished!  

 -Lily

Linked up at some of the great blogs on my sidebar!

Friday, December 14, 2012

Roasted Winter Vegetables for Christmas Dinner

In the winter, sometimes I go to the grocery store and don't want to buy any fruits and veggies.  Everything is brown, wilted, and way out of season.  But, I still want to have lots of veggies in our diet.  One way I've done this is cooking more root vegetables, which are delicious even in the winter.   This would be a perfect side dish for Christmas dinner, right next to the turkey and gravy, yummm!

What you need:
  • 1 medium sweet potato, cut into 1 inch pieces
  • 1 medium onion, chopped
  • 3 carrots, cut into 1/2 inch thick rounds
  • 1 Tbs olive oil
  • 1/4 tsp black pepper
  • 1/4 tsp salt
  • 1/4 tsp garlic powder
Let's get cooking:
Mix all ingredients in a medium bowl.  Lightly spray an 8 x 8 glass dish with cooking spray, then pour in the veggies.

Bake at 400 degrees for about 35 minutes, or until the veggies are soft.
That's it--simple, seasonal roasted veggies for dinner!
-Lily

linked up at some of the great blogs on my sidebar

Tuesday, December 11, 2012

DIY Ornament Christmas Wreath

Recently, I've seen ornament wreaths everywhere.  I think they look so fun and festive, but I also like the traditional look of a greenery wreath.  So, I busted out the hot glue gun and came up with this great combo wreath.  It only took a few minutes to make, and then a few more minutes to make the bow, so it was a quick-and-easy project!

I took a box of cheap ornaments, and moved them around my pine wreath until I was happy with the color distribution, then hot-glued them on.  I pointed the ornaments in all different directions to get a fun, random look.

Then I made a bow with wire-edged ribbon and hot-glued it to the wreath.  I'm sure there is official ribbon-attaching wire that I was supposed to use, but I just went for it and hoped that my ribbon wouldn't melt.  It worked, I think it turned out awesome :)

-Lily

Linked up at some of the great blogs on my sidebar!

Thursday, December 6, 2012

Christmas Wreath Ribbon Bow Tutorial

Last week I was trying to make a wreath with one of those really big wreath bows on it, but I didn't know how to make one.  I couldn't find any good tutorials, so I came up with a super-easy way to make a ribbon bow.  You can also check out my tutorial for making the ornament wreath.

To make the bow, all you need is a 12 ft spool of 2 1/2" wire-edged ribbon. 

1.  Cut a 9 ft piece of ribbon and a 3 ft piece of ribbon.  Hold one end of the long piece and make a 4 or 5" loop.

2.  Make a 4 or 5" loop on the other side of your hand.  Your bow will be about 8-10" across, depending on how large you want it.  Wrap the ribbon around 4 more times, making sure that the end is in the back.

3.  Find the middle of the short piece of ribbon.  Fold it in thirds and wrap around the center of the bow.

4.  Tie the short piece in a knot at the back.  Arrange the ends so they are both on one side of the bow.  Trim the ends at an angle.

5.   Slightly fan out the loops of the bow, and you're done!
-Lily


 Linked up at some of the great blogs on my sidebar!

Monday, December 3, 2012

Nativity Markers for an Advent Calendar

 A few weeks ago I posted a tutorial for my advent calendar.  A few days ago, just in time for December, I finally finished it.  I decided to put a baby Jesus in the December 25th pocket and move the star each day--when the star reaches baby Jesus, it's Christmas!  Each night this month, we'll read part of the Nativity story with the kids, then move the star a little closer to Jesus and talk about how on Christmas we celebrate his birthday.

I put a piece of Velcro on the back of the baby and the front of the hay, so the kids can have fun laying him in the manger.
 Now I want to make a flannel board and a whole Nativity set like this, since they're so cute and I think the kids would love it.  But, I don't think I'll have the time before Christmas--maybe next year??

What you need:  I used felt for the front and an extra-heavy stabilizer for the back, so these shapes are pretty sturdy.  Hopefully they can withstand a one- and two-year-old.
  •  Peltex sew-in ultra firm stabilizer
  • scraps of felt
  • embroidery floss
Let's get sewing:
1.  Cut out a manger shape, an oval, and a star from the peltex.  Use these as templates to cut out shapes from the felt: yellow star, brown manger, yellow straw, and a white oval.  Also, cut out a peach circle for the baby's face.

 2.  Pin or hold the peltex and felt together, then use embroidery floss to sew them together.  I used a blanket stitch around the edges with 2 strands of embroidery floss, but you can use more strands if you'd like more noticeable stitches.

3.  To attach the baby's face and the straw that overlaps the manger, I used a simple running stitch.  Then I added half-circles for Jesus' closed eyes, and a few lines of blue backstiches to look like he's swaddled.  Last, I attached the velcro to the manger and the back of the baby.

-Lily


Linked up at some of the great blogs on my sidebar!

Thursday, November 29, 2012

Tutorial: Spider-Man Pajamas from a T-Shirt (Part 1)

Ever since I started sewing, my pack-rat tendencies have gotten a little out of hand.  I have stacks and stacks of old clothes that I can't bear to give away--it's free fabric after all, and maybe I could use it one day (I know, big maybe...)  

I found a tutorial at It's Always Autumn on making little man pj's from a t-shirt, and I knew I had to make some cute jammies for my little man.  Just making grey pants and a black shirt seemed awfully plain.  I added a grey spider to the shirt, and suddenly, they're awesome Spider-Man pajamas! 
My adorable model, I think he's singing "Itsy Bitsy Spider"
This is part 1, where I'll cover how I made the raglan shirt.  Check out part 2 for the pants tutorial.
What you need:
  •  XL men's shirt (plenty of material for size 2T pj's)
  •  pair of pajamas to use as pattern pieces
  • matching thread
  • ball-point needle for sewing knits
 Let's get sewing:
1.  Lay out your pattern piece at the center of the t-shirt, lining up the bottom hems and folding in your sleeves.  Cut about 1/2 inch away from the edge (to allow for seam allowances).  If you want to make set-in sleeves, check out the original tutorial.

2.  Cut sleeves from the sides of the shirt.  Again, use the existing hem at the bottom of the t-shirt and add 1/2" on all sides for seam allowances. 

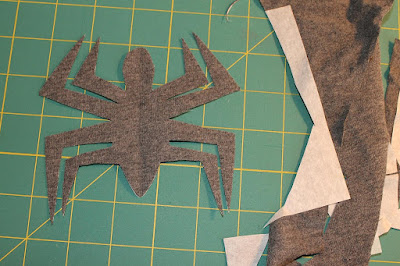
3.  Cut out a spider (I did this free-hand, but I'm sure you could find a Spider-Man printable for a template.)  I used extra material from the sleeve of my t-shirt.  **But, you might want to wait until after you cut out your pants to cut out the applique, since you'll be using the sleeves to make the pant legs.

 I used fusible web to attach the spider to the front of the shirt.  Then I sewed around with a straight stitch about 1/8" from the edge to securely attach it, leaving the edges raw.

4. Place shirt pieces right sides together and sew the two sides, up to the bottom of the diagonal.  Since I don't have a serger, I had to decide whether to use a straight stitch or a zig-zag stitch.  I ended up sewing 1/2" from the edge with a straight stitch, then 1/4" from the edge with a zig-zag because I've read about popped seams when working with knits.

5.  Place sleeve pieces right sides together and sew along both sides, leaving the diagonal open.

6.  Turn the sleeves right-side out.  Place one inside the shirt, with right sides together.  Line up the seam at the bottom.  Starting at the back neck point, sew along one side of the diagonal, across the seam, then along the other side of the diagonal.

Repeat for the 2nd sleeve.

7.  Turn the shirt right-side out.  Cut the collar off your XL t-shirt.  Measure the collar of your pattern pj's and add about 1", then cut your collar piece.  Tuck in one end 1/4" and tuck the other end inside.  You should now have a circular collar with no raw edges.

Center the collar join in the back.  Pin the collar around the top of the shirt, aligning the raw edges.  Sew together with a zig-zag stitch.

Fold down the collar, then sew 1/8" under the collar with a straight stitch.  Make sure to stretch as you sew so the stitching won't be too tight to stretch over a toddler's head.

And that's it, you've finished the top and are ready to move on to making the pants! 
-Lily

Linked up at some of the great blogs on my sidebar

Monday, November 19, 2012

Advent Calendar Tutorial

Sometimes, projects can sit around waaaay too long.  For example, I started this advent calendar last November...and I just finished it.  But, it's the end result that matters, right?  And it did turn out really cute, so I'm glad I didn't try to rush it.  Don't be alarmed, it's a pretty simple project.  About 98% of the time I took to finish it was spent procrastinating.  
Now all I have to do is make a felt marker to move from pocket to pocket.  Hopefully that doesn't take me until next Christmas!  (Update: Check out the tutorial for the felt star and baby Jesus markers I made)

What you need:
  • 1 main fabric, 24 x 22 inches
  • 1 backing fabric, 24 x 22 inches
  • 1 piece of batting, 24 x 22 inches
  • 4 pieces of fabric 8 x 8 inches, for the tabs.  I don't recommend a directional fabric, or you might have upside-down trees like me, oops.
  • 5 pieces of white fabric, 9 x 20 inches, for the pockets
  • Red felt
  • White and green embroidery floss
Let's get sewing:  I used all-purpose white thread and a 1/2" seam allowance.

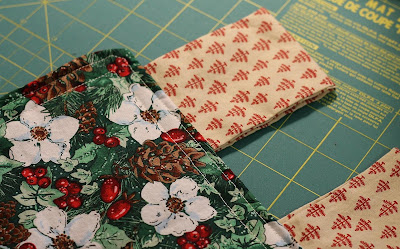
1.  First, make the pockets.  I decided it was a lot easier to make 5 long pockets and divide them with quilting lines, rather than sew on 25 separate pockets.  Fold your rectangles in half, right sides together, so that you have 4.5 x 20" rectangles.  Sew around the 3 open edges, leaving a 3" opening for turning.  Clip your corners (see pic) so they'll lay flat when turned out.
Turn out the pockets, press, and topstitch 1/8" and 1/4" away from the folded edge.

2.  Next, make the tabs.  Fold the squares in half, right sides together.  Sew along the open long side of the rectangle formed.  Turn out and press. 

3.  Place your backing and main fabrics right sides together, and place the batting on top.  Pin the the tabs along a short end.  Place between the main and backing fabrics, aligning the raw edges.  Place the two outer tabs 1" from the edge and leave about 2.5" between tabs.

Sew around all four edges, leaving a 5" opening in the bottom for turning.  Turn out, then topstitch 1/4" and 1/2" away from the edge.

Your calendar should now look like this:

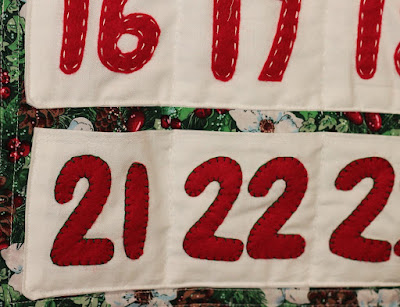
4.  Cut out 40 1.5 x 2.5" rectangles from red felt, then cut out all the numbers by hand.  (I started with rectangles because it helped me keep the numbers a consistent size.)

5.  Lightly mark the pockets about every 3 3/4"--that's where the dividing lines for the pockets will be.  Use these lines to help center your numbers.

I couldn't decide whether to use white or green thread, a running or blanket stitch, so I used all of them to attach my numbers.  You can use your preferred hand stitch, or even attach the numbers by machine.  I used 2 strands of embroidery floss.

6.  Now attach your pockets to the calendar.  Note that in my pic, I don't have the numbers attached.  I added them after sewing the pockets to the calendar, which I think was a bad idea.  It was really hard to get my needle in and out behind the pocket without sewing through the main fabric.  If I did this again, I would attach the numbers first, then attach the pockets second.

Pin your pockets on the calendar and topstitch along three edges to attach, leaving the top of each pocket open. 

7.  Using your marks as a guide, topstitch about every 3 3/4" to form pockets.  I did this with hand-quilting, but you could also use a machine.
Have fun counting down and preparing for Christmas!
-Lily

Linked up at some of the great blogs on my sidebar