Showing posts with label upcycle. Show all posts

Monday, December 31, 2012

Tutorial: Spider PJ's from a Men's T-Shirt (Part 2)

Several months ago, I found a fun tutorial on how to make little man PJ's from a men's X-large t-shirt.  I thought it was an awesome idea, but I didn't follow the tutorial exactly when I made mine.  So, I thought I'd show how I made my little guy his awesome spider pajamas!

I posted the first part of this tutorial over a month ago, and time has somehow gotten away from me over the holidays, so I'm finally posting the second half.  In the first part of the tutorial, I showed how I made the raglan shirt.  Here, I'll show how I made the pants.
What you need:
  • XL men's shirt (plenty of material for size 2T PJ's)
  • pair of pajamas to use as pattern pieces
  • matching thread
  • ball-point needle for sewing knits
  • 1/2 yard of 3/4 inch elastic

Let's get sewing:

1.  Lay out the men's t-shirt flat.  Place your pattern pajama pants on top of one sleeve, lining up the hem of the pants and the hem of the sleeve.  I used the whole width of the sleeve, so I didn't have to worry about sewing the inseam of the pants.  I cut about 2 inches above the top of the pants to allow enough fabric to form the elastic casing.

Repeat this step on the other sleeve.

2.  Turn one pant leg inside-out.  Place the right-side out leg inside the other (it should look like the pic).  Match the U-shaped seam and sew, using a 1/2 inch seam allowance.

I originally used a straight stitch, but then did some reading and found that a lot of people have problems with straight stitches popping on knits.  So, I added a zig-zag stitch, too. (I don't think this was the best solution, but using this method I didn't have to actually make a decision about which stitch to use.)

3.  Turn the pants inside-out.  Fold down the top edge 1/2", then another 1" to form the casing.  Topstitch 1/8" away from the edge, leaving a 3" opening. 

4.  Use a safety pin to thread the elastic through. 

5.  Overlap the elastic ends 1/2" and sew together.  Tuck inside the casing and sew closed. 

Turn your pants right-side out, and your little man PJ's are ready to go!
-Lily

Linked up at some of the great blogs on my sidebar!

Thursday, November 29, 2012

Tutorial: Spider-Man Pajamas from a T-Shirt (Part 1)

Ever since I started sewing, my pack-rat tendencies have gotten a little out of hand.  I have stacks and stacks of old clothes that I can't bear to give away--it's free fabric after all, and maybe I could use it one day (I know, big maybe...)  

I found a tutorial at It's Always Autumn on making little man pj's from a t-shirt, and I knew I had to make some cute jammies for my little man.  Just making grey pants and a black shirt seemed awfully plain.  I added a grey spider to the shirt, and suddenly, they're awesome Spider-Man pajamas! 
My adorable model, I think he's singing "Itsy Bitsy Spider"
This is part 1, where I'll cover how I made the raglan shirt.  Check out part 2 for the pants tutorial.
What you need:
  •  XL men's shirt (plenty of material for size 2T pj's)
  •  pair of pajamas to use as pattern pieces
  • matching thread
  • ball-point needle for sewing knits
 Let's get sewing:
1.  Lay out your pattern piece at the center of the t-shirt, lining up the bottom hems and folding in your sleeves.  Cut about 1/2 inch away from the edge (to allow for seam allowances).  If you want to make set-in sleeves, check out the original tutorial.

2.  Cut sleeves from the sides of the shirt.  Again, use the existing hem at the bottom of the t-shirt and add 1/2" on all sides for seam allowances. 

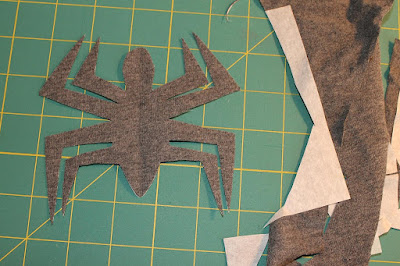
3.  Cut out a spider (I did this free-hand, but I'm sure you could find a Spider-Man printable for a template.)  I used extra material from the sleeve of my t-shirt.  **But, you might want to wait until after you cut out your pants to cut out the applique, since you'll be using the sleeves to make the pant legs.

 I used fusible web to attach the spider to the front of the shirt.  Then I sewed around with a straight stitch about 1/8" from the edge to securely attach it, leaving the edges raw.

4. Place shirt pieces right sides together and sew the two sides, up to the bottom of the diagonal.  Since I don't have a serger, I had to decide whether to use a straight stitch or a zig-zag stitch.  I ended up sewing 1/2" from the edge with a straight stitch, then 1/4" from the edge with a zig-zag because I've read about popped seams when working with knits.

5.  Place sleeve pieces right sides together and sew along both sides, leaving the diagonal open.

6.  Turn the sleeves right-side out.  Place one inside the shirt, with right sides together.  Line up the seam at the bottom.  Starting at the back neck point, sew along one side of the diagonal, across the seam, then along the other side of the diagonal.

Repeat for the 2nd sleeve.

7.  Turn the shirt right-side out.  Cut the collar off your XL t-shirt.  Measure the collar of your pattern pj's and add about 1", then cut your collar piece.  Tuck in one end 1/4" and tuck the other end inside.  You should now have a circular collar with no raw edges.

Center the collar join in the back.  Pin the collar around the top of the shirt, aligning the raw edges.  Sew together with a zig-zag stitch.

Fold down the collar, then sew 1/8" under the collar with a straight stitch.  Make sure to stretch as you sew so the stitching won't be too tight to stretch over a toddler's head.

And that's it, you've finished the top and are ready to move on to making the pants! 
-Lily

Linked up at some of the great blogs on my sidebar

Monday, September 17, 2012

15 T-shirt Tutorials

I made this custom T-shirt Quilt a few years ago.  I should get around to making a tutorial, but for now, I'll just list other people's projects


I must have dozens of X-Large shirts sitting in the back of the closet.  It seems like we get them free everywhere but nobody in our house wears them.  Not even when I was nine months pregnant did I need an XL shirt, but for some reason that's the only size they give away at blood drives, picnics, and every group gathering.  So, after making my T-shirt Ruffle Skirt, I thought it would be fun to look at other projects that I could make with all those T-shirts sitting around.

I know that there are lots of pictures floating around the internet, but many have no patterns or tutorials to go with them.  So, I rounded up my favorite 15 t-shirt tutorials:

1.  Braided Rag Rug

2.  Random Ruffles Skirt

3.  T-shirt Yarn

4.  Plushie Robot Doll

5.  Tote Bag

6.  T-shirt Quilt

7.  Braided T-shirt Bracelets

8.  Little Girl Sundress

9.   T-shirt Dress

10.  Infinity Scarf

11.  Shag Rag Rug

12.  T-shirt Bag

13.  T-shirt Diaper

14.  Braided Scarf

15.  Baby Bib
 
 
And a bonus tutorial:  Messenger Bag from Cargo Pants!  This looked so cool I had to pass it along.  I'm not sure I have extra cargo pants sitting around.  Maybe I could borrow some of my husband's and he wouldn't notice...
 -Lily

Wednesday, September 12, 2012

T-shirt Ruffle Skirt--Pattern and Tutorial

I love to find fabric--especially if it's free or dirt cheap.   My hoarding strategic collecting is now becoming a problem, as my stash and three sewing machines are taking over two rooms in our house, not to mention a closet (or two).  For really cheap fabric, keep all your family's used and unwanted clothes, blankets, fabric shower curtains, etc. to use in future upcycling projects!

For this skirt, I used two large t-shirts that nobody was ever going to wear.  They probably would have ended up in the garbage if I hadn't saved them.  And I made this fantastically free skirt!

What you need:
  • 2 large or XL t-shirts.  Blank shirts work best (or ones with small writing, like I used)
  • 1/2 inch elastic
  • thread to match your t-shirt color.  I used Coats and Clark All-Purpose.
  • Ball point needle for sewing knit fabrics
What you do:   I used a 1/2 inch seam allowance unless otherwise indicated.

1.   Lay 1st t-shirt out flat.  Cut across at armpits.  Discard neck and sleeves (or save for another project!).  Keep the bottom tube for the skirt.
Cut through both layers at armpits--discard neck and sleeves.

2.  Lay out 2nd t-shirt flat.  Cut across at armpits and discard neck and sleeves.  Cut two tubes for your ruffle.  I want my ruffle to be 5 in, plus 1/2 in seam allowance, so I cut two 5 1/2 inch tubes.  I did not finish the bottom edges of of my ruffle, I just let them roll. 

3.  Cut open the ruffle tubes to create two long rectangles.  Sew the short ends together, right sides together, to create one long tube.  Use a 1/2 inch seam allowance and backstitch at beginning and end of seams.


4.  Now you'll gather the long tube into a ruffle.  Use the longest stitch length on your machine.  Do not backstitch at the beginning or end of your seam, and leave the thread tails long.  Sew two rows, about 3/8  and 1/8 in away from the fabric edge.  Then pull on the top thread tails to gather into a ruffle.

5.  Gather your ruffle so that it is approximately the same size as the cut side of your skirt piece. 


6.  Pin the ruffle to the cut edge of your skirt tube, right sides together.  Sew the ruffle to the skirt with a 1/2 inch seam allowance. 

7.  Measure your hips (or waist--wherever you want the skirt to rest at).  Cut elastic to this measurement.  I didn't have 1/2 in elastic on hand, so I used two pieces of 1/4 in elastic, which worked ok.

8.  Now you'll thread the elastic though the hem of the t-shirt, which you'll use like a pre-made casing.  Cut a 1/4 inch slit in the inside layer of the hem.  Make sure not to cut through both layers!
My scissors pointing at the tiny slit in the t-shirt hem.

9.  Use a safety pin to slide elastic into hem.

10.  Overlap the elastic ends about 1 inch and pin.  Try on your skirt and see how it fits--you may want to make the elastic tighter.  I ended up overlapping the ends about 2 inches and trimming some off.  Once you're happy with the fit, sew the elastic together, backstitching to secure.  Be sure your elastic isn't twisted before you sew it together.  (I have two elastic pieces to sew in the picture, but you should only have one.)


11.  Poke the joined elastic into the slit.

12. Hand-sew the slit closed.

Done!  Go and show off your cute skirt!
-Lily