I like to use double-fold, straight-grain binding. Many people use bias strips, but that isn't necessary unless you have curved edges (for example, if you have a scalloped edge on your quilt). I use double-fold binding because it's the most durable.
Let's get sewing:
1. First, estimate how much fabric you need. I know, we have to do math. But you don't want to run out of fabric halfway through binding your beautiful quilt.
Measure your quilt top on all four sides and add together, then add about 10" extra. For this quilt, the top was 69" and the sides were 87". So, add 87 + 87 + 69 + 69 + 10 = 322 inches
Most fabric has 40" useable width, so divide by 40 to determine the number of strips you need to cut: 322/40 = 8.05 I would buy enough fabric to make at least 8 or 9 strips.
I cut my strips 2 3/8" wide. So I need: 2.375" x 9 strips = 21.4 inches. I'd buy 2/3 yard (24 inches) to make this quilt binding.
2. Fold binding fabric in half, selvedge to selvedge. Trim off the selvedges.
3. If you need to, fold in half again. Use your rotary cutter to cut 2 3/8" strips across the width of the fabric. Cut the number of strips that you calculated in step 1.
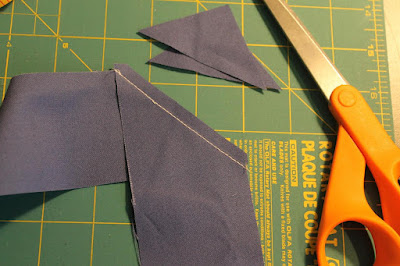
4. Next, attach strips together. Place two strips right sides together at a right angle, overlapping the ends 1/8". Draw a diagonal line from notch to notch where the ends overlap, as shown below. Then sew on the marked line.
Repeat until you have attached all your strips together. Then trim the seam allowances to 1/4".
 |
| Trim seam allowances to 1/4" |
7. One one end, press down the edge to form a 45 degree angle. Trim 1/4" inside this angle. (You'll use trimmed edge to attach your quilt binding).
Now, go you're ready for the next step, How to Attach Quilt Binding by Machine
-Lily


No comments:
Post a Comment
Join the conversation--your comments make me happy!