Showing posts with label homemade recipe. Show all posts

Tuesday, June 18, 2013

Honey Wheat Hamburger Buns

I'd been making my Honey Wheat Sandwich Bread a lot when my husband asked if I could make some hamburger buns.  I decided to use the dough from my sandwich bread, and just form it into buns (rather that loaves) at the last step.  It worked great!  I get to use my super-easy dough recipe, and we have delicious buns for burgers and our favorite pulled pork.
What you need:  for 16 buns
  • 1 Tbs yeast
  • 3 cups lukewarm water (about 100 degrees)
  • 4 Tbs oil
  • 1/2 cup honey
  • 5 1/2 cups bread flour
  • 3 cups whole wheat flour
  • 2 1/4 tsp salt
Let's get cooking:
1.   Combine yeast and water.  (You can sprinkle with 1/8 tsp sugar to help activate the yeast).  Let sit about 5 minutes, until foaming.  Then add oil and honey.

2. Combine flours and salt in a stand mixer.  Use the dough hook attachment.  With the mixer on low speed, slowly pour in the yeast mixture. 

Note:  if you don't have a stand mixer, you can still make this simple dough.  Pour the yeast mixture into the flour mixture as in step 2.  Mix slowly until well combined.  Turn out onto a floured surface and knead about 6 minutes by hand until dough is smooth and elastic.  Then continue with step 5.

3.  Increase mixer speed to medium for 3 minutes.  Then turn off mixer and let dough rest 5 minutes.

4.  Turn out dough onto a floured surface.  Knead about 50 times by hand, until the dough is smooth and elastic. 

5.  Place dough in a lightly greased bowl.  Cover and let rise until double, about 1 to 1 1/2 hours.  Punch dough down.

6.  On a lightly floured surface, divide dough into 16 equal parts and form into balls.  Cover with a kitchen towel and let rise until double, about 30 minutes.

7.   Preheat oven to 375 degrees.  Bake for about 15 minutes, until just turning golden.  I bake mine on a preheated stone, but you can also use a cookie sheet.

8.  Remove from pan and allow to completely cool on wire racks.  Store on the counter for up to 3 days in an airtight container. 

I like to slice them and freeze in large Ziplocs for up to 1 month.  (They probably freeze longer with no problems, but at our house homemade bread rarely hangs around that long).
-Lily

Monday, April 29, 2013

Honey Wheat Sandwich Bread

I have been searching for the perfect sandwich bread recipe since I first started making homemade bread about 5 years ago.  I tried multiple recipes, but they were always lacking something.  They were either too small, too soft, too dense, or too much work!

Even after learning how to make great bread like homemade dinner rolls and homemade pizza crust, I still didn't have a good sandwich bread.  We've been buying cheap Aldi's bread with lots of corn syrup and preservatives, yuck!  So, I tweaked, adapted, and increased a basic bread recipe to come up with this delicious honey wheat bread.  It's simple, and is the perfect size and texture for sandwiches.
This recipe takes about 3 hours from start to finish.  But don't panic, almost all of that is rising and baking time.  All you have to do is the initial mixing and kneading (and if you have a stand mixer, this is done for you), shape the dough into loaves, and pop it in the oven.

What you need:  for 2 loaves
  • 1 Tbs yeast
  • 3 cups lukewarm water (about 100 degrees)
  • 4 Tbs oil
  • 1/2 cup honey
  • 5 1/2 cups bread flour
  • 3 cups whole wheat flour
  • 2 1/4 tsp salt
Let's get cooking:
1.   Combine yeast and water.  (You can sprinkle with 1/8 tsp sugar to help activate the yeast).  Let sit about 5 minutes, until foaming.  Then add oil and honey.

2. Combine flours and salt in a stand mixer.  Use the dough hook attachment.  With the mixer on low speed, slowly pour in the yeast mixture. 

Note:  if you don't have a stand mixer, you can still make this simple dough.  Pour the yeast mixture into the flour mixture as in step 2.  Mix slowly until well combined.  Turn out onto a floured surface and knead about 6 minutes by hand until dough is smooth and elastic.  Then continue with step 5.

3.  Increase mixer speed to medium for 3 minutes.  Then turn off mixer and let dough rest 5 minutes.

4.  Turn out dough onto a floured surface.  Knead about 50 times by hand, until the dough is smooth and elastic. 

5.  Place dough in a lightly greased bowl.  Cover and let rise until double, about 1 to 1 1/2 hours.  Punch dough down.  Divide in half and let rest 5 minutes.

6.  Meanwhile, grease the bottom and 1 inch up on the sides of two 9 x 5 x 3 inch loaf pans.

7.  On a lightly floured surface, push one piece of dough out into a 12 x 8 inch rectangle.  Starting with a short edge, roll the dough into a log shape.  Place seam side down in a greased loaf pan.  Repeat with the 2nd half.  Cover and let rise until double, about 30 minutes.

8.   Preheat oven to 375 degrees.  Bake for about 45 minutes.  Cover top with foil the last 20 minutes so the bread doesn't over-brown. 

9.  Remove from pans and allow to completely cool on wire racks.  Store on the counter-top for several days in an airtight container.  Or, wrap tightly with foil and freeze for up to 1 month. 

Enjoy!
-Lily

Linked up at some of the great blogs on my sidebar!

Wednesday, April 17, 2013

Simple Dinner Rolls Recipe

Mmmmm, I love homemade bread.  And my husband loves it even more. I don't think I can overstate how much he loves bread.  To him, a multi-course gourmet dinner is not a complete meal without dinner rolls.  

I am a victim of my own success in the kitchen, and we are now food snobs:  since I have started making these rolls, we can barely stand eating rolls from a can or plastic bag.  They just don't have the delicious flavor and texture.  I always try to keep a stash of these delicious dinner rolls handy, so we can eat them with our chicken soup, ham and bean soup, or just about every other dinner I make. 
I love this recipe because it's so simple.  Many dinner roll recipes have you heat milk, add eggs, let the dough rise overnight, etc.  Compared to those recipes, this one is very basic (similar to my simple pizza crust).   I like to make a double batch and freeze half.  That way we always have rolls on hand, just as convenient but much more delicious than a can-o-rolls.

What you need:  for 12 rolls 
  • 2 1/4 tsp (1 package) yeast
  • 1/4 cup lukewarm water
  • 1/8 tsp plus 1 Tbs sugar
  • 1 tsp salt
  • 3 1/2 cups all-purpose flour, divided
  •  1 cup milk
 Let's get cooking:

1.  Add 1/8 tsp sugar to water.  Mix in yeast.  Let sit about 5 minutes, until beginning to foam.

2.  Meanwhile, mix sugar, salt, and 3 cups of flour in a medium bowl.  

3.  Add milk to the yeast mixture.  Stir into the flour mixture.  Stir until well combined.  Dust a flat surface with the remaining 1/2 cup of flour.  Knead until dough is smooth.  Form into a ball.
I like to knead my dough on a plate.  Then, when I'm done I can put the plate in the dishwasher--no mess!
4.  Place the dough in a large, greased bowl.  Cover and let rise until double, about 1 hour.

5.  Shape dough into 12 smooth rolls.  If you like pillowy soft rolls, place them in a well-greased 9 x 13 glass pan to rise.  If you like golden brown rolls, place them 2" apart on a floured surface. Cover and let rise about 30 minutes.

6.  Preheat oven to 375 degrees.  If you're baking in a glass pan, bake 15-20 minutes until the tops are turning golden.  I like to bake my rolls on a preheated pizza stone for about 15 minutes.  Then they're golden on the outside, but still soft inside.  

After they're completely cool, store in an airtight container 1-2 days on the counter.  Or, put them in ziplocs in the freezer and they save at least a month.  I don't think I've ever had them sit in the freezer longer than that.  They usually disappear in a few days. 
Enjoy!
-Lily

Linked up at some of the great blogs on my sidebar

Thursday, March 28, 2013

Homemade Sausage and Cabbage Soup

 It's almost April, and Easter is this weekend, but it still feels like winter here.  There's still snow on the ground and it has been so cold.  I really hope it warms up soon, I can't wait until spring arrives!  But in the meantime, I keep making warm and hearty soups for dinner.  

This sausage and cabbage soup started out with me saying "I have sausage in the freezer and leftover cabbage...what can I make with that??"  I came up with this soup, and to be honest I was a little iffy about it as I was cooking.  I was doubting if my family was going to eat it.  But, I should have had more faith in my cooking abilities:  both of the boys loved it.  And my husband gobbled it up and told me that I should add cabbage to my chicken noodle soup, too.  I don't think I'll be adding cabbage to all my soups, but it does taste good in this one!
 What you need:  for about 10 servings
  • 8 oz Great Northern beans, soaked overnight or quick soaked according to package directions
  • medium onion, chopped
  • 3 carrots, chopped
  • 12 oz cooked sausage, sliced thinly
  • 3 cloves garlic, minced
  • 1 small head of cabbage (about 1/2 of a medium or large head)  Remove outer leaves and core, then chop
  • 4 cups water
  • 14 oz can diced unsalted tomatoes, undrained
  • 1 tsp salt
  • 1/2 tsp black pepper
  • 1 tsp dried basil
  • 1 tsp dried parsley flakes
Let's get cooking:
1.   Drain soaked beans, then add to a medium pot with enough water to cover by 1 inch.  Bring to a boil, then reduce heat and simmer 1 1/2 to 2 hours until soft.

2.  Meanwhile, add remaining ingredients to a stockpot.  Bring to a boil, then reduce heat and simmer about 1 hour.

3.  Drain beans, then add to the stockpot.
 Enjoy your delicious soup for dinner!
-Lily

Wednesday, March 6, 2013

Made-from-Scratch Homemade Chili Recipe

Even though it's March, it was snowing yesterday--and we have about a foot of snow still on the ground!  Weather like this makes me crave comfort foods like this yummy chili.  It's warm, hearty, and so delicious.  

Mmm, peppers, tomatoes, onions--chili has lots of veggie goodness, plus plenty of healthy and filling beans.  I like to start with dried beans because I like to control the salt in my dishes, and because I like texture better.  But, if you're in a hurry you can substitute canned beans.  You can also make it in the crockpot all day and come home to delicious chili waiting for you.


 Ingredients:  For about 8 servings
  • 8 oz dried kidney beans
  • 4 oz dried Great Northern beans
  • 4 oz dried black beans
  • 12 oz ground beef
  • 1 medium onion, chopped
  • 1/2 green bell pepper, chopped
  • 1/2 red bell pepper, chopped
  • 4 cloves garlic, minced
  • Two 14.5 oz cans no-salt-added diced tomatoes, undrained
  • 8 oz can no-salt-added tomato sauce
  • 1 tsp salt (if using canned beans, I would start with 1/2 tsp and add more if needed)
  • 1 to 3 tsp chili powder, to taste
  • 1/2 tsp dried basil
  • 1/2 tsp black pepper
  • hot sauce to taste
Note:  if using canned beans, substitute two 15 oz cans kidney beans, rinsed and drained

 Let's get cooking:
1.  Rinse and soak dry beans overnight (or quick soak) according to package directions.  Drain beans, then place in a pot with enough water to cover the beans by at least 1 inch.  Bring to a boil, then simmer about 1 1/2 to 2 hours, or until soft.

2.  In a large skillet, cook the ground beef until meat is cooked through.  Drain fat.  Remove from skillet.

3.  In skillet, cook onions, peppers, and garlic until soft.

4.  In a stockpot, combine the ground beef, onion, peppers, garlic, tomatoes, and tomato sauce.  Add the cooked beans and spices.  Bring to a boil, then reduce heat.  Simmer 1 hour. 

Slow-cooker directions:  Follow directions as above.  In step four, combine the ingredients in a slow-cooker.  Cook on high for 8 hours or on low 4 hours.
Since I have one- and three-year-olds, I don't make my chili very spicy.  Instead, after we've dished up our chili, my husband and I add hot sauce to taste.  This way, each person controls how spicy it is.

Enjoy your hot, hearty, homemade chili!
-Lily


Linked up at some of the great blogs on my sidebar!

Friday, January 25, 2013

Easy, made-from-scratch, baked Mac 'n' Cheese recipe

Yummm, made-from-scratch, simple, delicious mac 'n' cheese!  As convenient as the blue boxes are, they can't compare to the creamy, cheesy goodness of the homemade version.  The whole family loves this dish.  I think we can all agree, even the pickiest eater gobbles up macaroni and cheese!

I've tried to make this dish several times with different recipes.  Most recipes start off by making a white sauce on the stove.  Every time I've followed a recipe like that, it's been disappointing.  First off, it takes a lot of time and effort to stand over the stove and baby the sauce.  Second, it always tastes a little grainy, not smooth and creamy.  Maybe I'm not making the sauce correctly?? 

Well, it doesn't matter anymore, because I discovered how to make homemade mac 'n' cheese in one step--no stovetop, no grainy sauce.  You just mix everything together, pop it in the oven, and enjoy your delicious, cheesy macaroni!  I like to add ham and peas to make this a one-dish meal.  Just serve with a salad and veggies, and you have a simple lunch or dinner.

What you need:
  • 2 tsp cornstarch
  • 2 cups shredded cheddar cheese
  • 8 oz uncooked elbow macaroni
  • 1/2 tsp dry mustard
  • 1/2 tsp salt
  • 1/2 tsp garlic powder
  • 1/2 cup frozen peas (optional)
  • 1 cup diced ham (optional)
  •  2 1/2 cups milk
Let's get cooking:  Makes about 8 servings.  Total time:  90 minutes

1.  Preheat oven to 375 degrees.  Spray 8 x 8 inch glass pan with nonstick spray.

2.  Toss together the cornstarch and cheese in a mixing bowl until the cheese is coated.  (This helps the cheese stay creamy as it melts)

3.  Add pasta, spices, peas, and ham and stir together.  Pour in the milk.

 4.  Pour the mixture into your glass pan.  It looks really milky, but don't worry.  The noodles will absorb the liquid as they cook.

 5.  Cover with aluminum foil and bake 40 minutes.  Remove the foil, then bake 25-30 minutes more until the cheese on top is browning and the liquid is absorbed.  Let it rest 10 minutes before serving.

See?  I told you, easy-peasy cheesy noodles :) 
-Lily

Linked up to some of the great blogs on my sidebar!

Friday, December 14, 2012

Roasted Winter Vegetables for Christmas Dinner

In the winter, sometimes I go to the grocery store and don't want to buy any fruits and veggies.  Everything is brown, wilted, and way out of season.  But, I still want to have lots of veggies in our diet.  One way I've done this is cooking more root vegetables, which are delicious even in the winter.   This would be a perfect side dish for Christmas dinner, right next to the turkey and gravy, yummm!

What you need:
  • 1 medium sweet potato, cut into 1 inch pieces
  • 1 medium onion, chopped
  • 3 carrots, cut into 1/2 inch thick rounds
  • 1 Tbs olive oil
  • 1/4 tsp black pepper
  • 1/4 tsp salt
  • 1/4 tsp garlic powder
Let's get cooking:
Mix all ingredients in a medium bowl.  Lightly spray an 8 x 8 glass dish with cooking spray, then pour in the veggies.

Bake at 400 degrees for about 35 minutes, or until the veggies are soft.
That's it--simple, seasonal roasted veggies for dinner!
-Lily

linked up at some of the great blogs on my sidebar

Wednesday, November 14, 2012

Homemade Ham and Bean Soup

Mmmm, soups really are my family's favorite food all winter.  I love how they are cheap, easy, and oh-so-delicious. 

We often buy spiral-sliced hams (we actually just bought two, they're on sale right now for Thanksgiving).  But after you eat all the slices, you're left with a bone and a bunch of scraps.  That's where this great recipe comes in.  You save the bone and scraps, and toss them in a stockpot.  Add some beans and veggies = super cheap and delicious dinner.
This soup takes about 4 hours total, but it's simmering for most of that time and you don't have to do anything.  I usually start this after lunch, and when dinnertime comes supper is ready and waiting!
What you need: for about 10 servings
  • 1 lb Great Northern Beans, soaked overnight or quick-soaked
  • 1 spiral sliced ham bone and scraps  (the assorted pieces that aren't neatly sliced)
  • 8 cups water
  • 1/2 tsp garlic powder
  • 1 1/2 tsp Italian seasoning
  • 1/2 tsp ground black pepper
  • 2 medium onions, chopped
  • 3 carrots, chopped
Let's get cooking:
1. If you haven't soaked your beans, quick-soak them according to the package directions.
2. Meanwhile, in a large stockpot bring 8 cups water and your ham bone and pieces to a boil.  Reduce heat and simmer for 1-2 hours.
3. Remove ham bone and fat from the broth.  Save any pieces of ham from the bone, then discard.  Cut any large chunks of ham into smaller pieces, then add back to the stockpot.
4.  Drain beans and add to the soup.  Add spices.  Bring to a boil, then reduce heat and simmer about 1 hour.
5.  Add onions and carrots and simmer about 1 hour.

And that's it, five steps and your soup is ready :)
-Lily
Linked up at some of the great blogs on my sidebar!

Thursday, November 8, 2012

Homemade Brown Sugar

Who knew you could make brown sugar at home??

It's always exciting when I learn how to make something homemade.  And last week, I found the book The Homemade Pantry by Alana Chernila at the library.  There are a ton of great recipes to explore, and I'm sure I'll try several more.  The first one that caught my eye was homemade brown sugar.  It's never even crossed my mind that I could make it at home.  Apparently, it only takes two ingredients and takes about a minute.

Why have I been paying twice as much for brown sugar than for white sugar??  No more!  I have crossed another processed item off my grocery list :)

What you need:
  • 1 cup white sugar
  • 2 tsp unsulphured molasses
 (yes, that's really all you need)

Pour the molasses over the sugar. 

Fluff with a fork until it is all mixed in.  At first it looks like you've ruined your sugar, and it's all clumpy.

Don't worry.  Keep going, and in a minute you'll have brown sugar.
I've been using this for months in my recipes, and it tastes and acts the same as store-bought brown sugar.

-Lily

Linked up at some of the great blogs on my sidebar!

Thursday, October 4, 2012

Homemade Refried Beans


All my life, I've eaten the slimy mush from a can know as "refried beans".  I've never really liked it, but that's just what you eat with tacos.  Then I discovered that you can make your own refried beans, and they actually taste good.  These are our favorite side to homemade fajitas

Caution:  once you eat these you will NEVER want to go back to the canned version!
You've been warned.

What you need  For 6-8 servings (depending on how much you love beans):
  • 8 oz dried pinto beans, rinsed and soaked overnight (or quick soaked).  Follow the directions on the package.
  • 5 cups water
  • 1 onion, chopped
  • 2 Tbs oil
  • 1 recipe spice mix (see below)

For the Spice Mix: (Yes, this is almost the same as the chicken marinade in my fajitas.  Why mess with something that tastes so good?)
  • 2 Tbs oil
  • 6 cloves garlic, minced
  • 1 Tbs vinegar
  • 2 tsp soy sauce
  • 1/2 tsp liquid smoke
  • 1/2 tsp salt
  • 1/4 tsp black pepper
  • 1/2 tsp chili powder (optional)
  • 1/2 tsp cayenne pepper (optional)  Omit these if you don't like spicy beans.

Let's get cooking:

1.  Drain the beans from the soaking water.  Bring the soaked beans and 5 cups water to a boil--make sure to crack the lid, or it will overflow bean water everywhere!  Reduce heat to medium-low and simmer about 2 hours, until the beans are very soft.

2.  Meanwhile, chop up your onion.  Heat 2 Tbs oil in a skillet.  Add the onions over medium-low heat and let them caramelize for 30 min or more, until turning golden brown. 

3.  When the beans are fully cooked, drain the beans--but save the bean water!  Combine the beans and onions.  I like to mash mine with a potato masher, but you could use a blender/food processor if you like them very smooth. Use the bean water they were cooking in to reach the desired consistency.  I make mine a little runny because they tend to thicken as they cool.
4.  Heat up the refried beans to a simmer until the rest of  your meal is ready.  Now you can have healthy, tasty beans as the perfect compliment to your Mexican meals! 
-Lily


Sunday, September 30, 2012

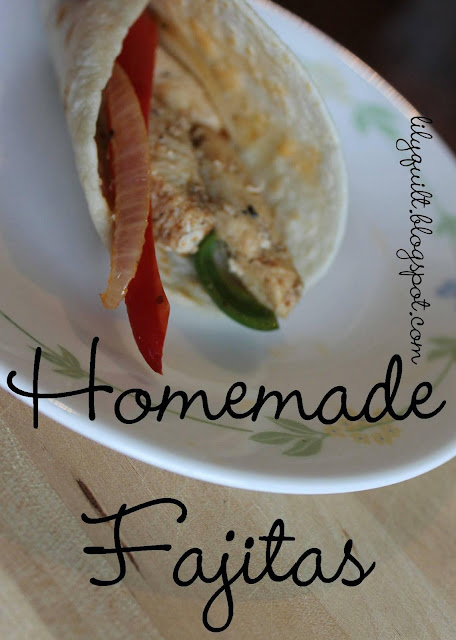
Homemade Restaurant Fajitas


I know, "homemade restaurant fajitas" is an oxymoron.  But, these fajitas are so good, they taste like you're at a restaurant!  Fajitas used to me my go-to dish when I went out.  I always ordered it, and sometimes Dan and I shared.

But no more.

Now, we never order fajitas.  I tried to a few times after making these, but I was always disappointed.  They were never as good as mine.  (Ok, maybe they were equal to mine.  But for 4 times the cost as making them at home, they'd better be amazing.)
What you need for 8 servings:
  • 1 large onion, sliced into rings
  • 1 red bell pepper, sliced
  • 1 green bell pepper, sliced
  • 1 lb boneless, skinless chicken breast
  • 2 Tbs oil, divided
  • Chicken marinade (see below)  
  • 6" tortillas
  • optional toppings such as avocado, sour cream, cheese, lettuce
Chicken marinade:
  • 1/3 cup water
  • 2 Tbs oil
  • 1 clove garlic, minced
  • 1 Tbs vinegar
  • 2 tsp soy sauce
  • 1/2 tsp liquid smoke
  • 1/2 tsp salt
  • 1/4 tsp black pepper
  • 1/2 tsp chili powder (optional)
  • 1/2 tsp cayenne pepper (optional)  Omit these if you don't like spicy fajitas.

Let's get cooking:

1. Cut chicken into strips, about 1/2" by 3".  Combine all marinade ingredients and add chicken.  Let marinade about 2 hours in the fridge. 

2.  Heat 1 Tbs oil in skillet over medium-high heat (or use a cast-iron griddle like in the pic).  Saute onions and peppers until softening.
Mmm, you can almost hear these sizzling!


3.  Remove veggies from skillet.  Heat 1 Tbs oil over medium-high heat, and cook marinated chicken.

4.  Serve on warm tortillas with any toppings you like.  We like lettuce, avocado, and homemade refried beans.

-Lily